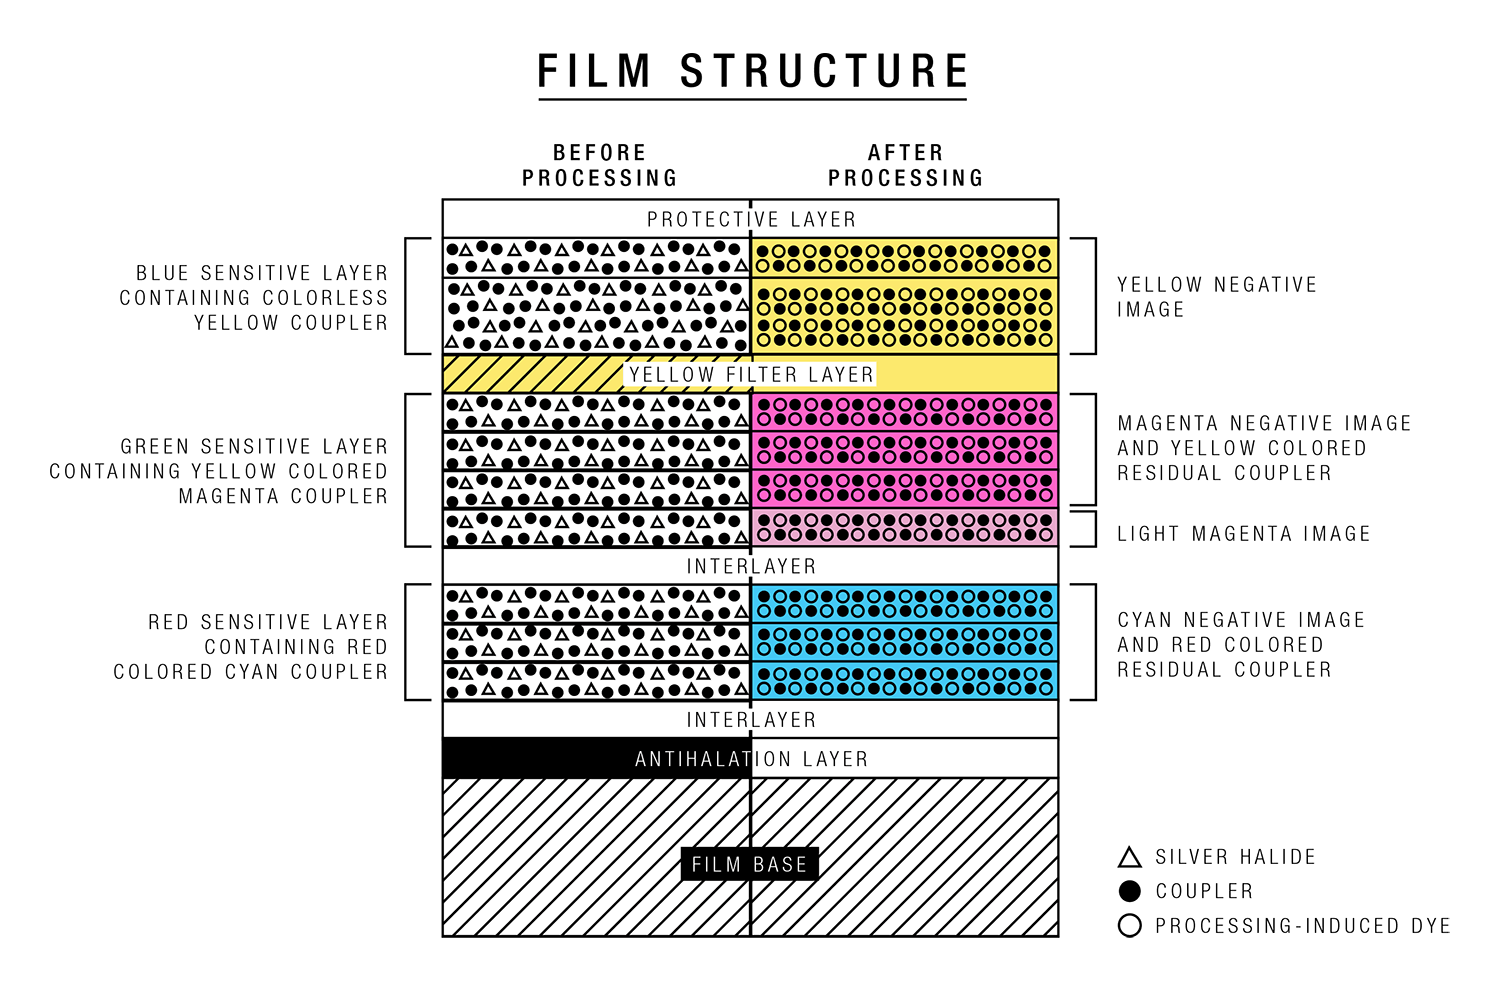
Photographic film is created by coating a transparent strip of plastic with a series of chemical layers that are sensitive to light. The combination and order of these layers is different for each type of film (color, black & white, slide, instant, etc). A lot of times you'll hear the word "emulsion" when referring to the chemical components of film. Emulsion is a scientific word for "mixture," and in most cases, when talking about photographic film, it is referring to those light-sensitive layers. These layers are made up of a gelatin emulsion containing microscopically small light-sensitive silver halide crystals. The sizes and varying characteristics of the crystals determine a film's sensitivity, contrast and resolution. When exposed to light, these crystals chemically change (with the change being proportional to the amount of light they are exposed to), which is what creates the imprinted image (often called "exposure") in the emulsion (chemical mixture) on the strip of film. This exposure can then be seen once the film is developed.
A film negative is the image created on a strip or sheet of photographic print film, after it is exposed to light. It's called a negative because it is the reverse of the actual image. The lightest areas of the image appear darkest and the darkest areas appear lightest. This reversal is caused by the light-sensitive chemical emulsion darkening as part of the chemical reaction that occurs when exposed to light. So, the more light, the stronger the chemical reaction and the darker the emulsion will become. With color negatives, the colors are also reversed in the negative (ie a red rose will appear cyan and a blue sky will appear yellow in the negative).
To create a "positive" image from a negative, you can either print directly onto photographic paper by projecting the negative onto the paper, or you can create a digital image by scanning the negative using a film scanner.
When using color reversal film, the exposed film is not called a negative. It is a positive transparency, or diapositive, because the exposed film is not reversal of the image. Instead, the exposure on the film it is a true representation of what was photographed. It is frequently called "reversal" film because it's the opposite of "negative" film.
There are three main characteristics that define film: Type, Speed and Format.
Type: The two basic film types are Negative and Reversal. Negative film, when exposed and developed, creates a transparent negative. Reversal film produces a positive transparency when exposed and developed, and is often called "Slide film" or "Chrome film."
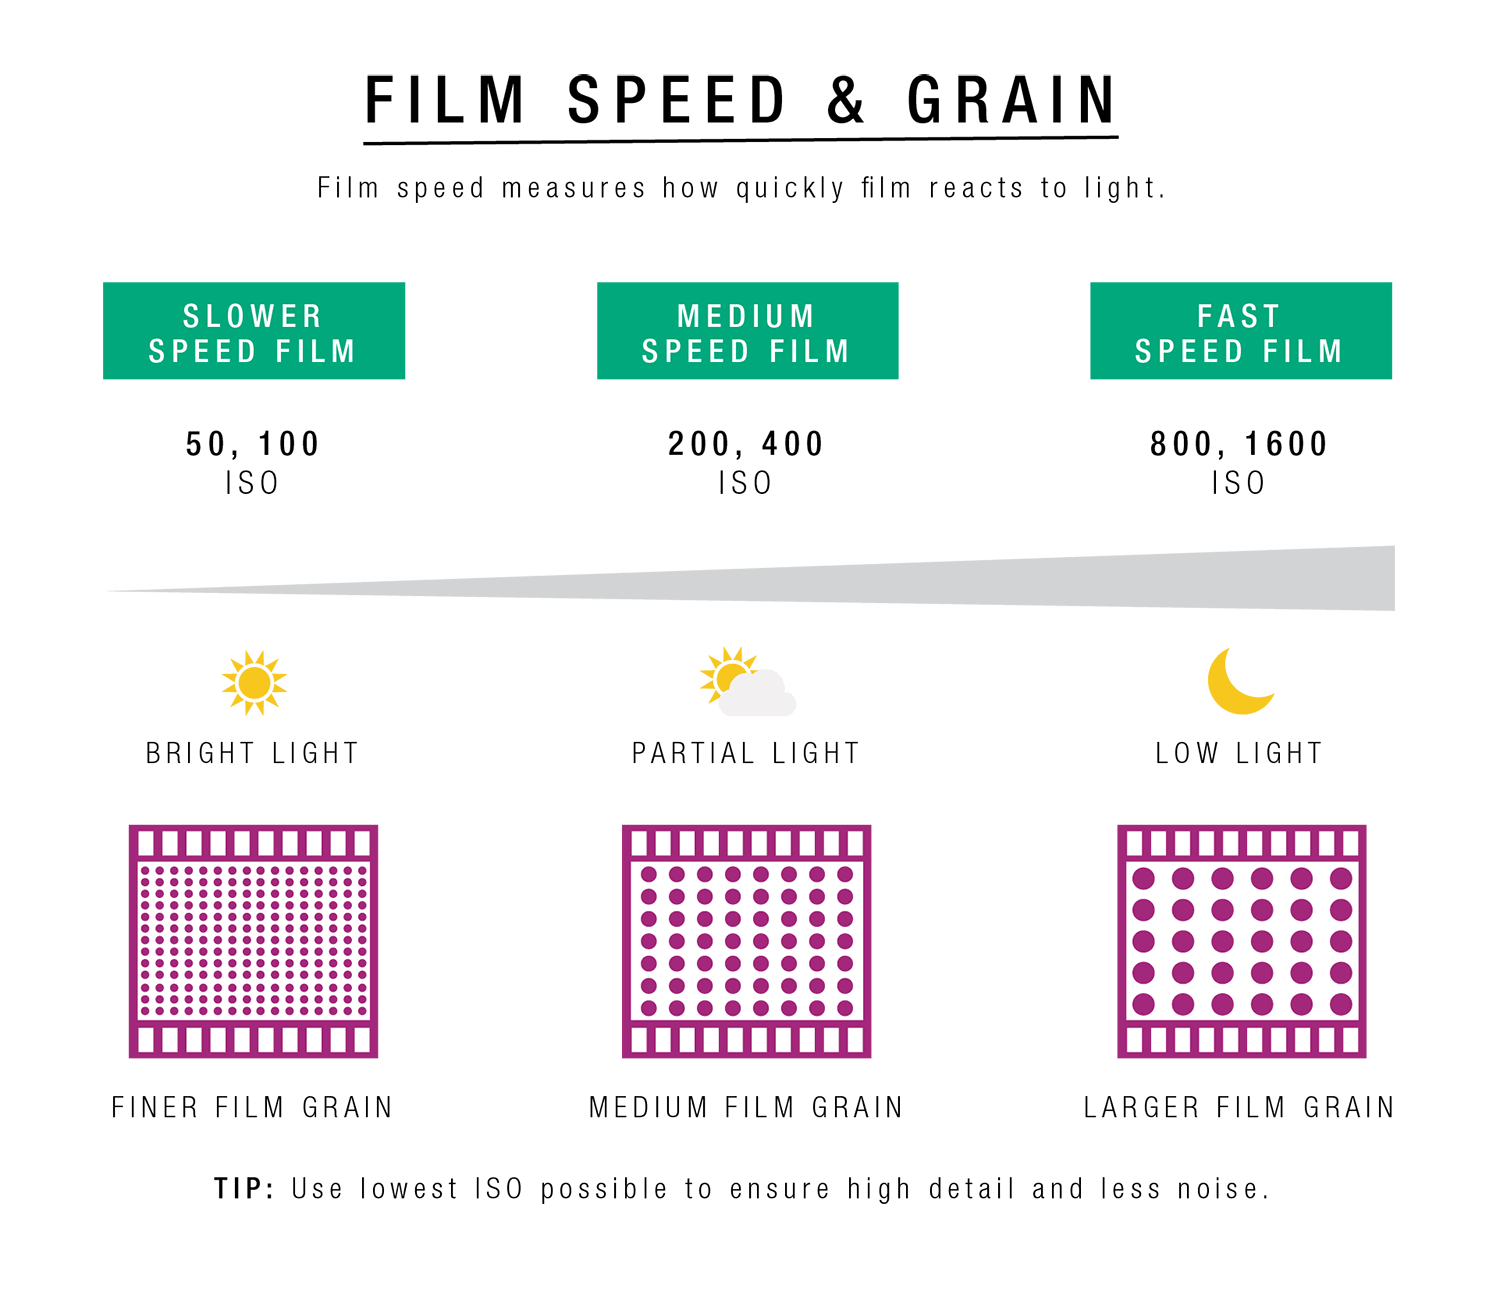
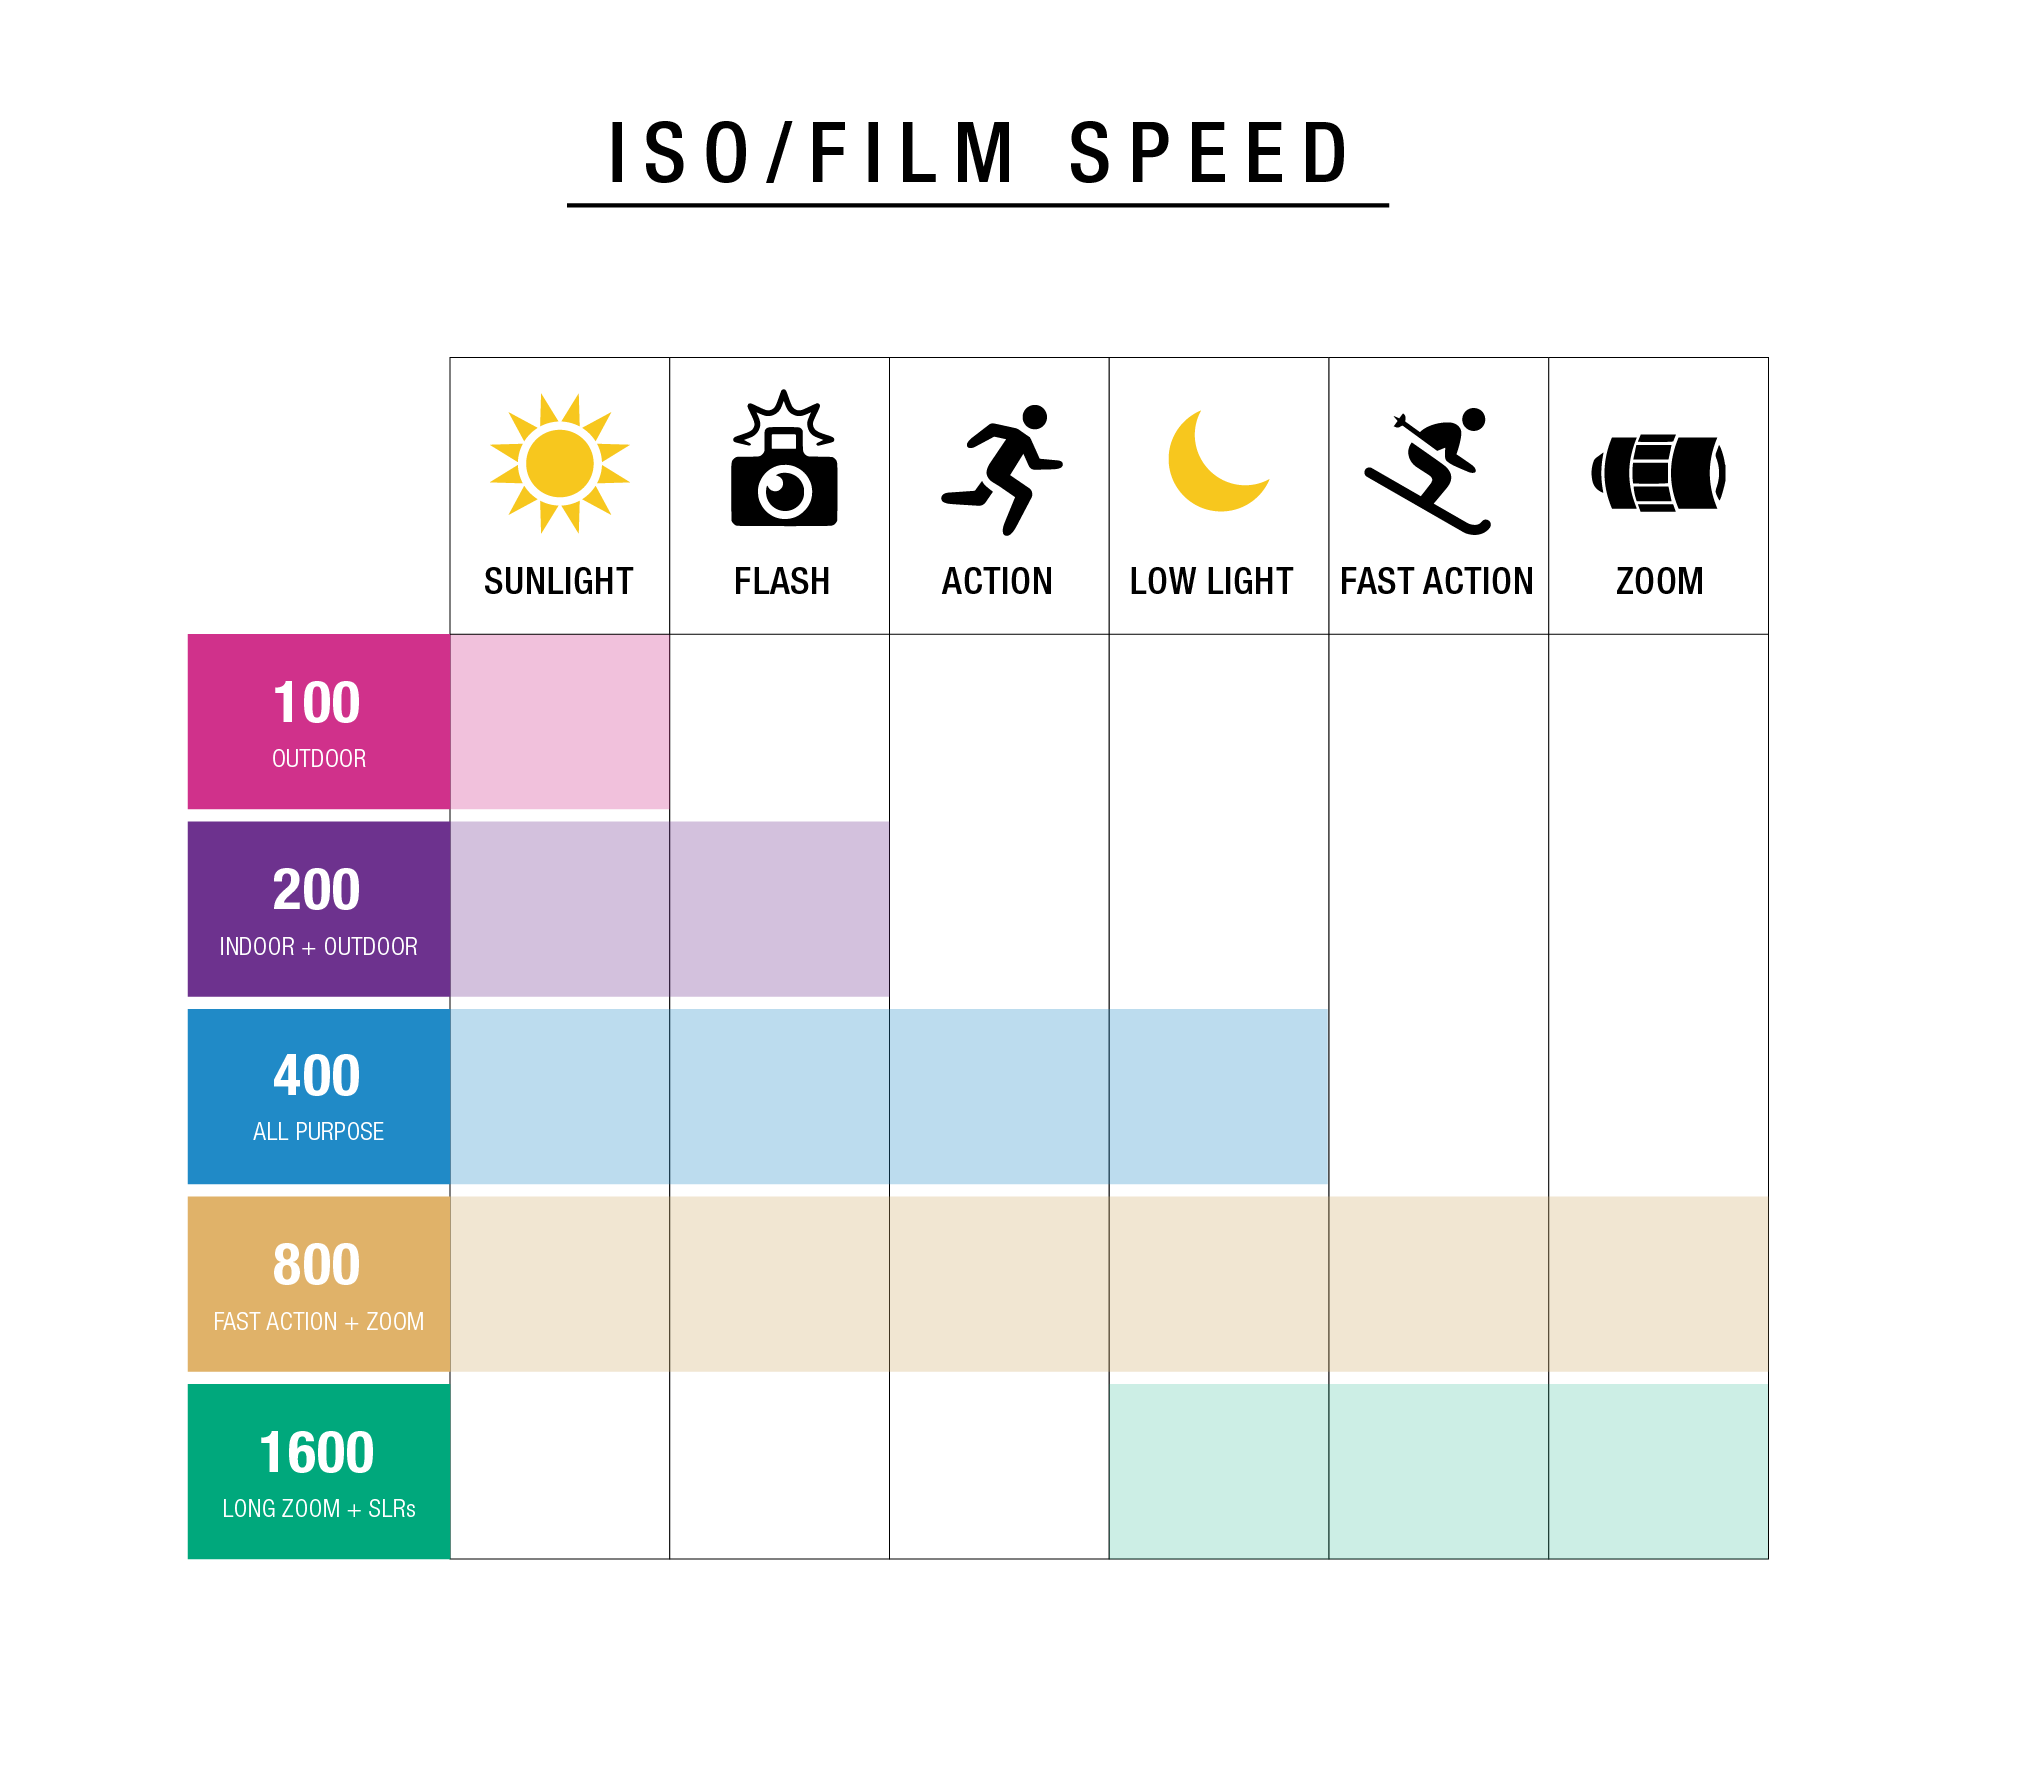
Speed: Film speed is defined by a film's sensitivity to light, and is most commonly referred to as ISO. "ISO" stands for International Standards Organization, and is an industry standardized scale for measuring sensitivity to light. The lower the ISO number, the less sensitive to light, and the higher the number, the more sensitive to light. The term film "speed" derives from how quickly a film emulsion can be properly exposed. For example, film with ISO 1600 is a fast film because it is highly sensitive to light and requires a short exposure time/less light in order to create proper density. ISO 50 film is a slow film because it is less sensitive to light and requires more exposure to light in order to produce the same image density. It's important to realize that the ISO speed of a film is a fixed value and cannot be changed in the camera like in a digital camera.
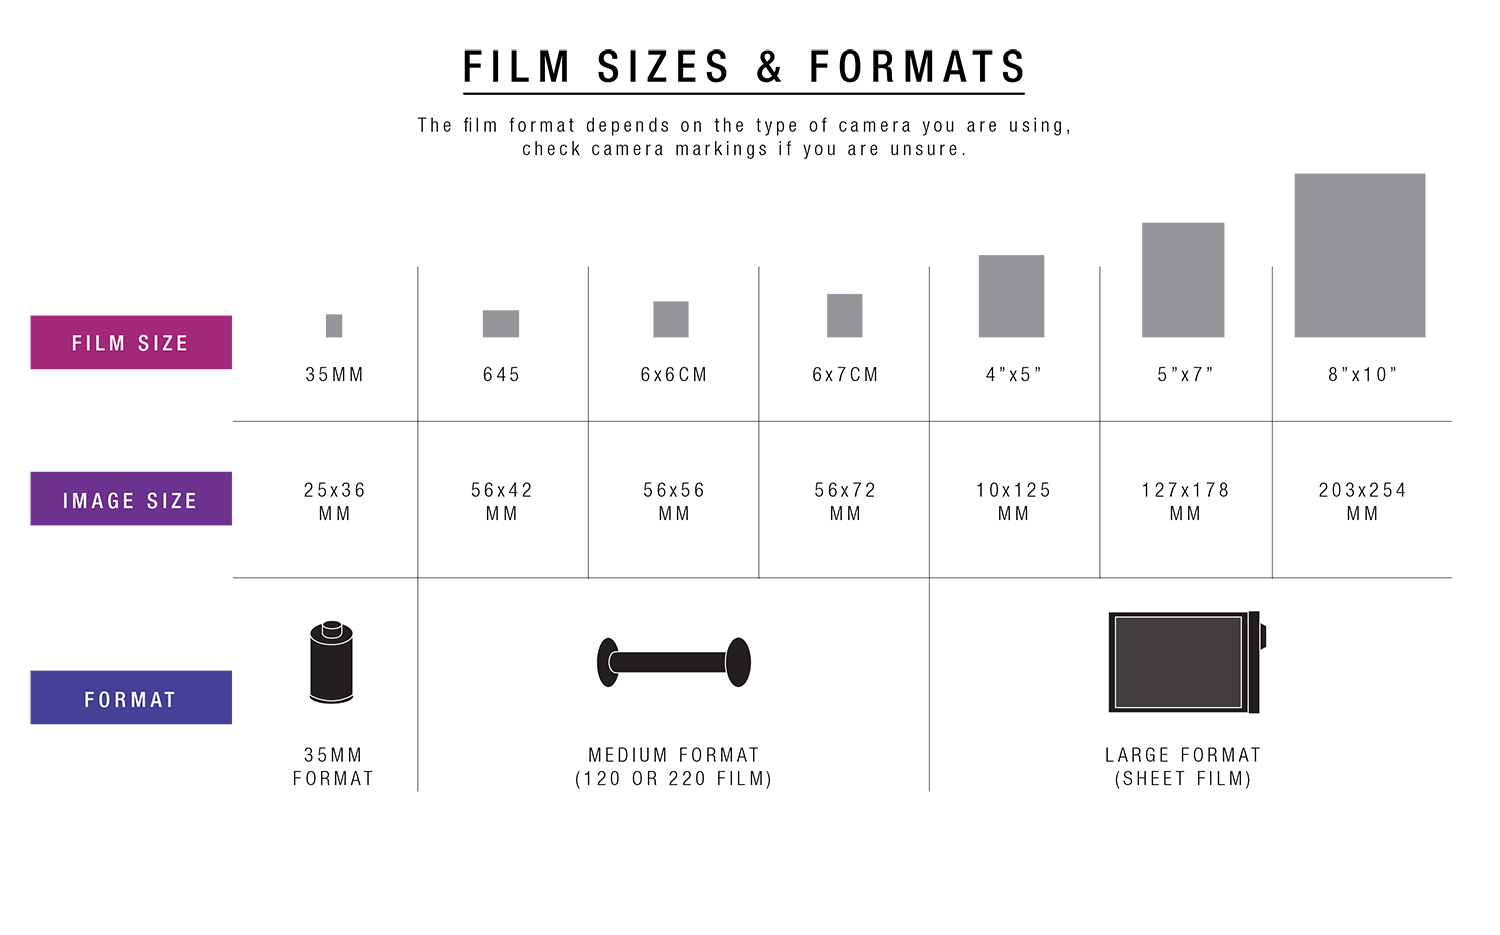
Format: Film format is determined by size and shape of the film. There are three main film sizes. 135, Medium Format, and Large Format. Within each of these film sizes there are a variety of aspect ratios that can be created in a frame, based on the camera design used. The larger the negative or transparency, the more information within and less distortion or grain visible when that image gets enlarged.
135: Also referred to as 35mm, it has a standard frame size of 36x24mm, and most frequently produces 24 or 36 exposures. The film has perforated edges, which allow the film to be wound to and from a spool within the camera back.
Medium Format: Larger than 135 film, it is 61mm wide and does not have perforated edges (the film moves from one spool to another in-camera when shooting - no need to rewind after finishing a roll). It comes in two main lengths, 120 and 220, with 120 being the most common. 120 film generates anywhere from 10 - 16 exposures per roll, depending on the camera used. Typical sizes/ratios are 6x7cm (10 exposures), 6x6cm (12 exposures), and 6x4.5cm (16 exposures). 220 Medium Format film is twice as long as 120, and does not have a protective backing paper on it (which allows the longer 220 film to fit in the same spool as 120 film).
Large Format: Also known as Sheet Film, Large Format is any film with a single frame size of 4x5 inches or larger. This is often called Sheet Film because each frame is a separate sheet, not on a consecutive roll or spool like 135 and Medium Format films.
Film "grain" is the visible appearance of the silver halide particles within the exposed emulsion of processed film. The amount of grain and size of grain are both optical effects that depend on the film stock and distance of observation (how much the image is magnified when printing or viewing on a monitor). The size of silver halide grains varies in film stocks. Larger grains of silver halide give film a greater sensitivity to light, and are used in higher-speed films (such as ISO 400 and above). Fine-grain films are generally slower speed, meaning they are less sensitive to light and require more exposure time or brighter light than faster speed films that produce more visible grain in images.
Resolution is generally similar to the idea of "sharpness" and depends on both the size of film grain, and the quality of lenses used. Film resolution is not the same as digital camera resolution. Good lenses are able to discern very fine details without distortion, and are measured by using parallel lines that get closer and closer together to see at what point the lines merge together. But the size of film grain also affects how finely the final image can discern details. Large grains (crystals) will not be able to reproduce fine details as well as small grains, so if detail is most important, you should use slower speed films. Manufacturers usually publish test data about resolution in the form of "MTF curves."
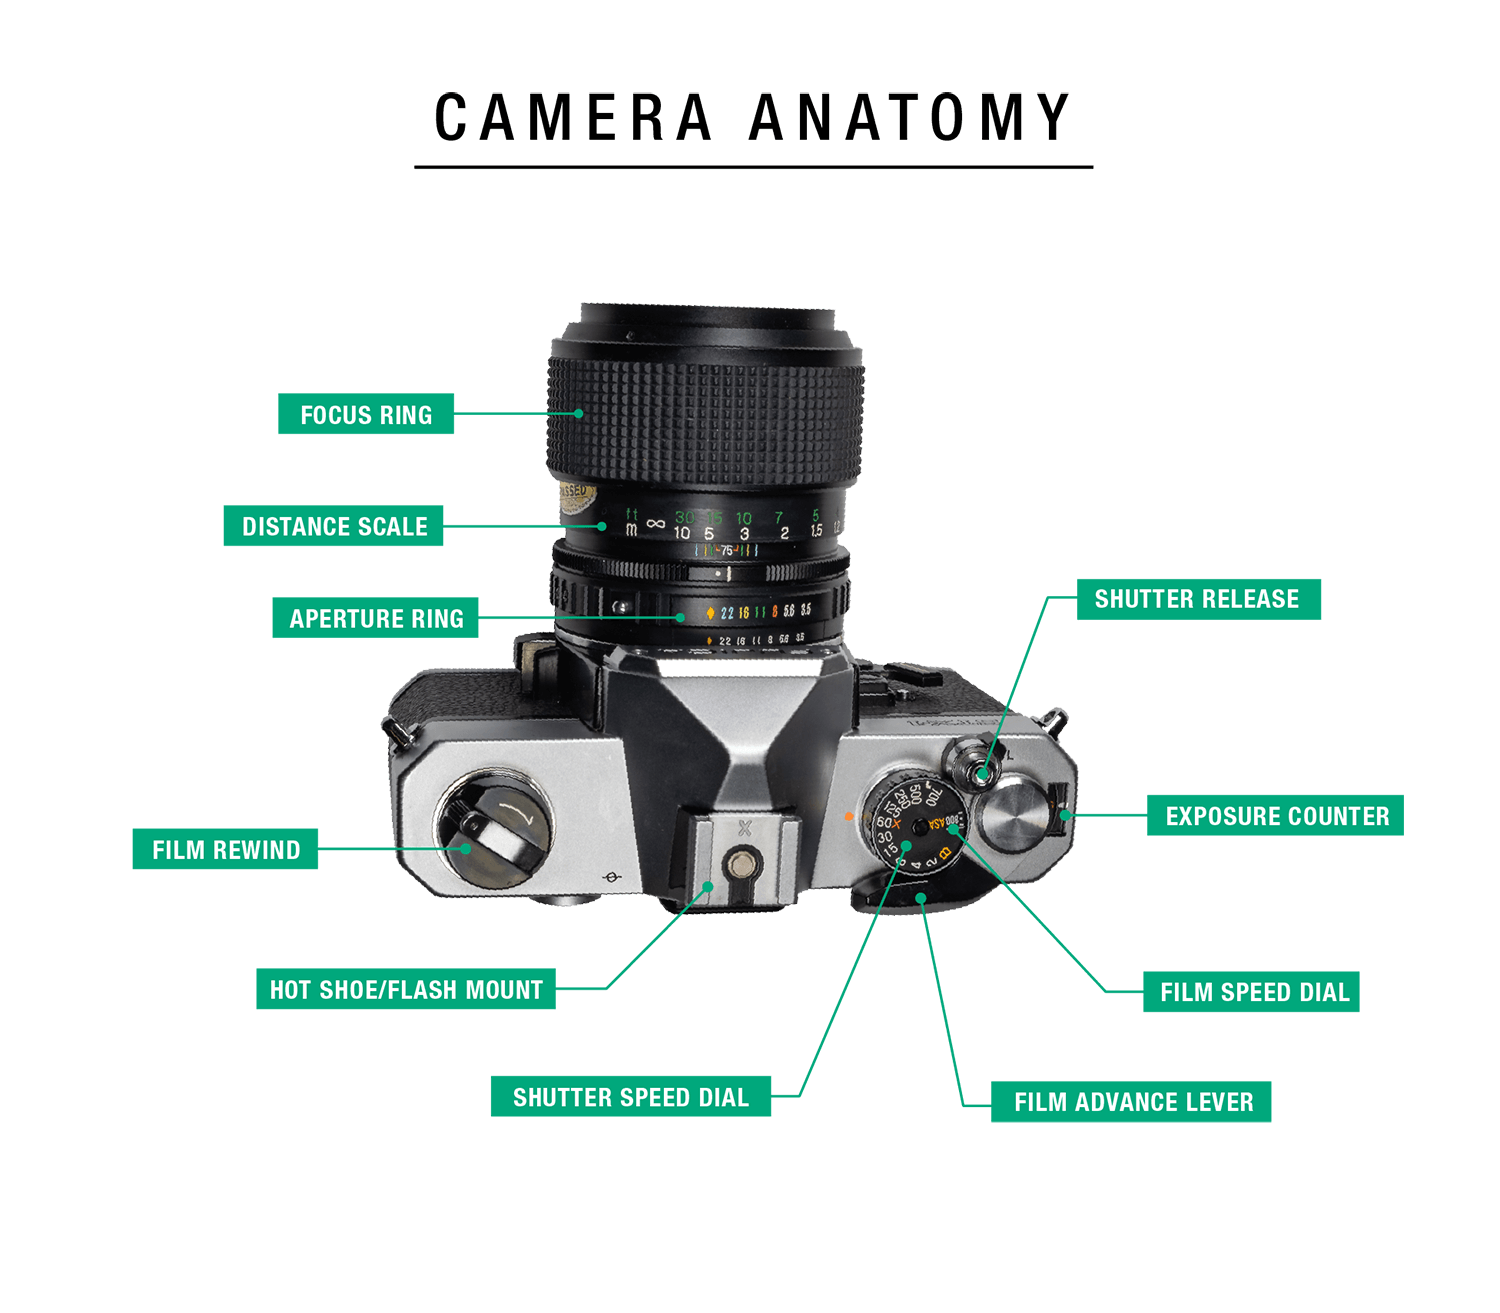
Most film cameras consist of six main components:
- Camera Body: A light-proof box, various sizes.
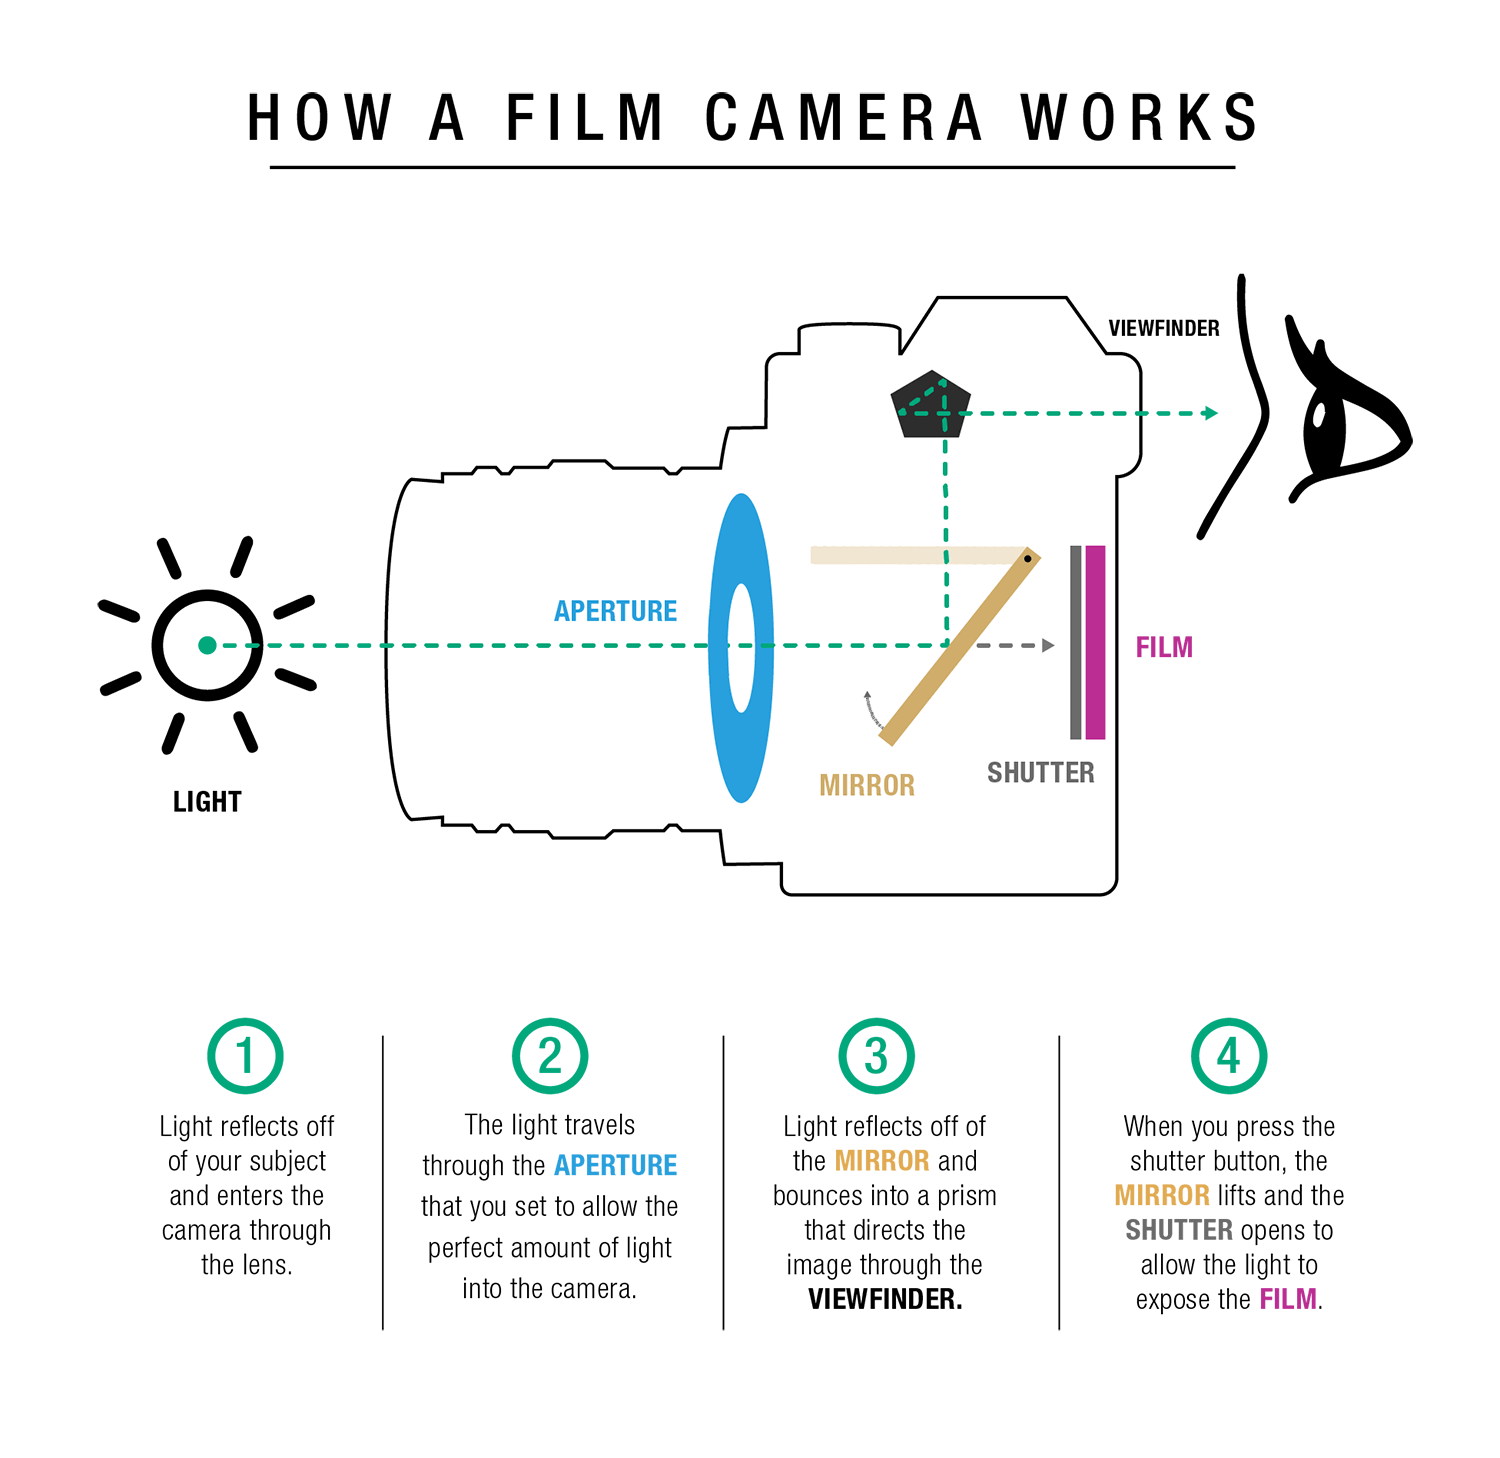
- Lens: A series of curved glass or plastic pieces, in a tube of sorts, attached to the front of your camera body, through which the image you are capturing is focused before being imprinted on your film.
- Aperture: A small opening in the lens, the size of which you can adjust to manage the amount of light coming into the camera when you release the shutter.
- Shutter: A mechanism within the camera or lens consisting of moving curtains or leaves that open and close (when you press the shutter release button) to allow the light coming into your camera body through the lens to be exposed to the photographic film loaded in your camera. Think of it as a valve.
- Film Compartment: Area in which photographic film is held flat against the back of the camera body, directly behind the shutter, with a mechanism to advance the film after each exposure is created.
- Viewfinder, Mirror, & Prism: The viewfinder is the eyepiece on the back of your camera through which you can preview a subject or scene before taking the photo. The image you see through the viewfinder is created by the light coming in through the lens hitting a mirror within the camera body that is diagonally angled to bounce the light upwards, where it is diffused through a complex prism that then redirects the light to the viewfinder.
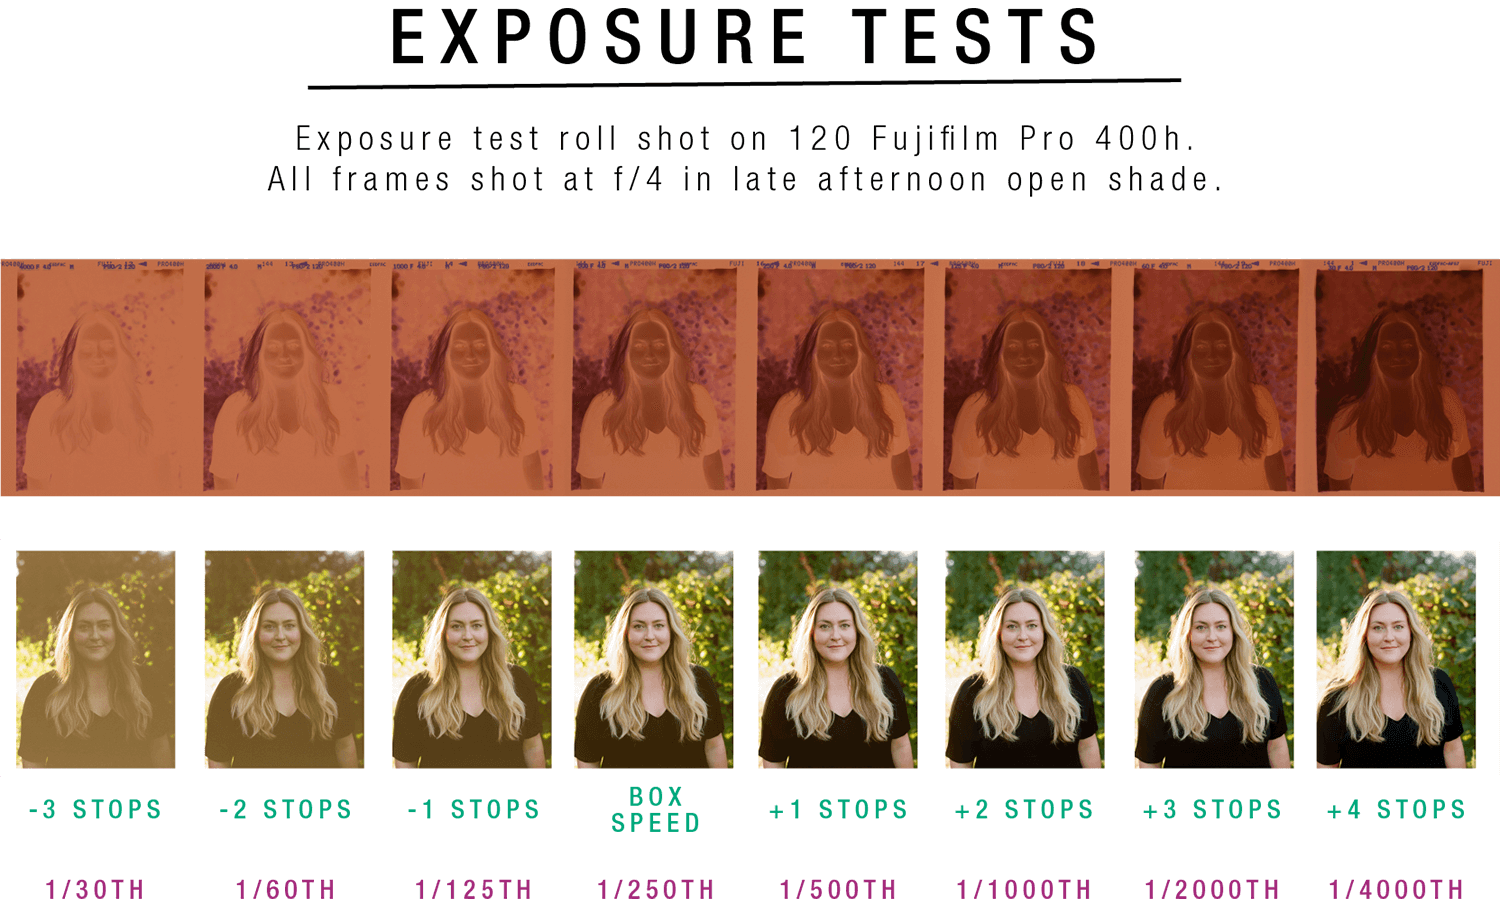
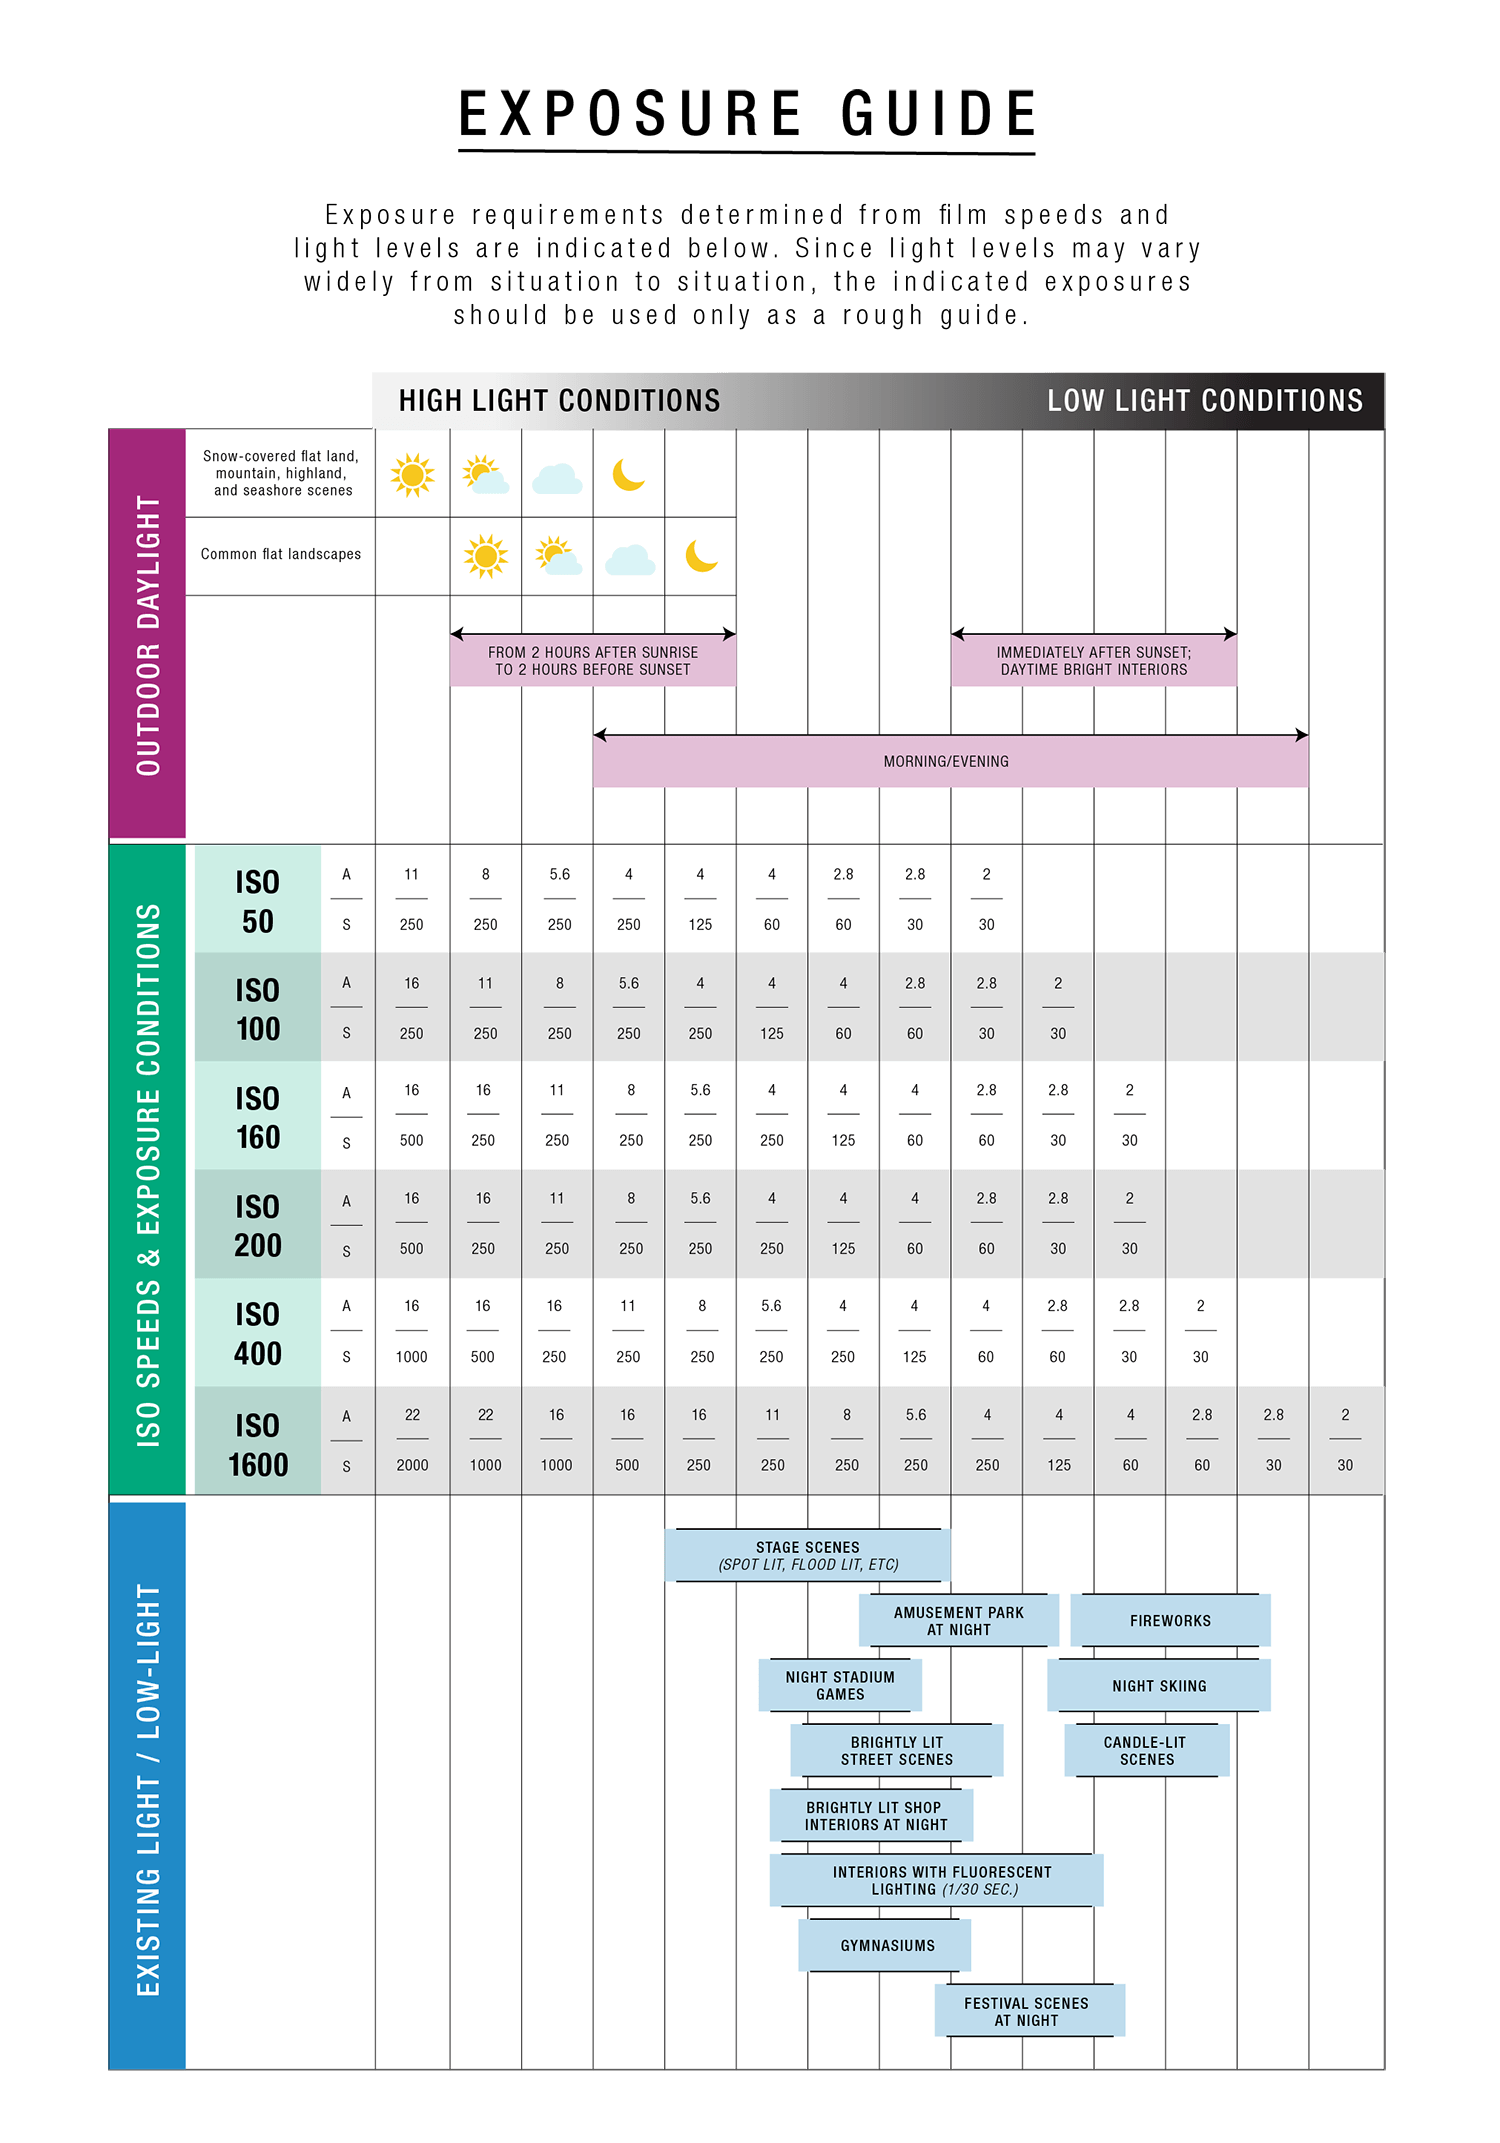
Both time and intensity of light affect the exposure of film, and it's important to know how light (or lack thereof) affects different film stocks. Every film stock is different, and every photographer's opinion subjective. By doing an exposure test, you can learn exactly how different exposures affect a specific type of film, and can hone in on what results you prefer, so you can replicate them in the future. If you're just starting out, running an exposure test for each film stock you use is a great way to learn the fundamental and practical aspects of how light affects film. If you're experienced, exposure tests are still a useful practice as a way of refreshing your knowledge, reevaluating your preferences, and exploring new and different lighting environments and film photography techniques.
Conducting an exposure test on a roll of film is usually done by "bracketing" many different captures. Exposure bracketing is the process of capturing the exact same image over the course of multiple frames, with each frame created with slightly different exposure settings. To determine the exposure of an image, you control two things: aperture and shutter speed. When doing an exposure test, adjust only one of these variables, allowing the other to remain the same throughout the entire exposure bracketing process.
Below is a step-by-step guide to shooting an exposure test on film:- Set your camera to manual mode for all functions
- Identify the box speed of the film you are testing. Box speed is the ISO rating of the film as determined by the film manufacturer. For example, the box speed for FUJICOLOR PRO 400H is 400.
- Before you begin, remember to take notes, recording your settings for each frame in order to refer back to this information when reviewing your results.
- Take a meter reading of your subject, with the meter ISO set to the box speed of your film, to determine the recommended exposure. This will serve as your "anchor."
- Adjust your aperture ½ to 1 f-stop up from your anchor setting (remember to keep your shutter speed the same), then move up ½ to 1 f-stop sequentially exposing the number of frames you want to test (generally, at least 3 frames on each side of your anchor is best so that you have a wide range of exposures to compare).
- Adjust your aperture ½ to 1 f-stop down from your anchor setting and then sequentially move lower by ½ to 1 f-stop each frame.
- Develop your film and review your results.
NOTE: Don't forget to communicate with your lab when you send in Bracketed Exposure Test roll. If they aren't aware that the roll was shot to test exposures, your professional lab may automatically try to compensate for the deliberately underexposed and overexposed negatives in the scanning process in order to "correct" the error as much as possible before delivering the digital scans.
The purpose of a handheld light meter is to measure the amount of light falling onto a subject and then, based on that reading, calculate the correct shutter speed and/or lens aperture at which your camera should be set for best exposure results. Most often, a meter is used by first setting the ISO and aperture on the meter and then taking a reading of the light in order to determine the best shutter speed for that specific situation.
There are four different types of hand-held light meters most often used by film photographers, but it should be noted that many light meters currently on the market are capable of providing all four different types of readings:
Incident-light Meter: This meter measures the overall light falling directly onto a scene or subject without being influenced by the brightness of the subject being photographed. An incident-light reading is usually measured using an integrating sphere (the hemispherical plastic dome, also known as a lumisphere) on a light meter. Because an incident-light reading is not affected by the subject's reflectance of light, it is less likely to cause incorrect readings caused from a large discrepancy in light between a subject and the background. To take an incident-light reading, you place your light meter at the subject's position and point the lumisphere towards the camera to read the light falling on your subject.
Reflected-light Meter: This type of meter measures the light being reflected off of a scene or subject. All in-camera meters are reflected-light meters, as the light from the subject is being reflected back into the camera sensor and measured for exposure. Reflected-light meters are calibrated to show the appropriate exposure for "average" scenes, so a major pitfall to avoid with this type of reading is the risk of underexposure when working with a scene that has a vast difference in lighting between subject and background. For example, using a reflected-light meter reading when photographing a tree backlit by the setting sun, the reading will most likely put too much emphasis on the bright sunset light, and may result in the image being too dark, it can also be used to measure separate parts of the image, such as a subject's face or shadow areas, which allows for more precise exposure settings to be determined.
Spotmeter: A spot meter is simply a reflected-light meter that provides a very precise reading focused on a narrow field of view. Instead of taking an average reading of your entire scene or subject, a spot meter measures light in a very tight cone (generally in on a one degree circular angle of view) within your frame, and then measures the light for only that targeted area. Any number of areas can be read to create a set of values for a particular scene, which then enables you to determine the most suitable exposure setting using systems like the Zone System. While extremely accurate, spot metering is more time intensive than Incident-light and Reflected-light metering, and is therefore less often used in fast-paced scenarios like events, portraits and weddings, and instead is most often used for landscape photography.
Flashmeter: This meter measures the short-duration light discharged by electronic flash sources and displays the correct working aperture. This type of meter normally measures the incident light falling on a subject, but some flashmeters are equipped to measure reflected light as well.
How to take an incident-light meter reading (most commonly used technique for film photographers in the portrait and wedding industry):
- Make sure your meter is set to incident mode
- Set the aperture and ISO on your meter
- Hold your meter in the light that is falling on the subject (with the bulb facing out, directed back at the direction where the camera lens will be positioned when you shoot)
- Press the measure button to take your reading
- NOTES:
- Many meters have a retractable lumisphere bulb. The lumisphere is designed to be out when taking one three-dimensional reading of all light falling on your subject, and retracted when taking multiple readings of individual light sources and then manually adjusting them to the desired ratio. Some photographers take single meter readings with the lumisphere fully retracted (often referred to as "bulb-in") while others meter "bulb-out." With the bulb-in, you'll get a reading that results in a 1/3 to 1/2 stop overexposure compared to a bulb-out reading. Keep this in mind, and whether you decide on bulb-in or bulb-out, stay consistent with your technique so that you are reading the light the same way every time and are better able to achieve consistency with your film exposures.
- Remember to not block the light when taking the reading (it's easy to forget and accidentally take a meter reading of your subject while blocking the light and casting a shadow on them, giving you an incorrect reading).
- When you are in the same light as your subject, you can take your reading from where you stand. However, if you are standing in different light than your subject (for example, under the shade of a tree while your subject is in direct sunlight), you will need to move to where your subject is and take your reading there so that you get an accurate reading of the light falling on your subject.
Every film camera is a little different, so make sure you read your camera's manual so you know how exactly you are to load film for your specific camera make/model. Below are general instructions to give you a general idea of the process necessary to load film. These instructions are not intended to be a substitute for the more specific instructions contained in your camera manual and you should refer to your camera manual in each instance.
35mm
- Open your camera by pulling up on the rewind knob (most 35mm cameras have a safety lock that you'll need to locate and either push in order to unlock or, hold down at the same time as lifting up on the rewind knob in order to open the camera). You will hear a "click" when the camera back opens.
- Open your camera back and insert the roll of 35mm film so that the leader film (the small portion of film that is already outside of the film canister) faces to your right. Note: some cameras require you to pull the rewind knob up in order to put the film in (and then require you to push the knob back down to hold the roll of film in place).
- Once the film is in place, gently pull on the leader film to extend the film across the camera back to reach the take-up spool on the right hand side of your camera (called the take-up spool). Line up the film strip holes with the sprockets along the camera back (this will enable the film to advance correctly when shooting) and place the end of the film strip through the slot in the empty take-up spool (some modern 35mm film cameras don't require this step. Refer to your camera manual if you are unsure.)
- If your camera is more automated, your next step is to close your camera back and listen to make sure you hear the camera advancing the film into place, meaning it is ready to start shooting.
- If your camera is entirely manual, you will then use the film advance lever to rotate the film and better secure it in the spool on the right hand side of your camera back. After pulling the advance lever, you'll press the shutter button once, advancing the film one more time.
- Once your film is loaded securely, close the back of your camera (make sure you hear the back snap shut) and press the rewind knob all the way back down.
- After closing your camera back, advance the film (by pressing the shutter button and then pulling the advance lever) until your frame counter is at "1" to ensure all of the film that was exposed to light during the loading process has been advanced.
- After shooting the entire roll of 35mm film, you need to rewind the film back into the film canister before opening the camera back and removing the roll of film to be processed.
- Some more advanced film cameras have an automatic rewind function that happens as soon as the final frame is shot. If your camera requires you to manually rewind your film, lift up the rewind lever, press and hold the film release button (usually located on the bottom of the camera) and use the rewind lever crank to rotate the film back into the canister.
- Once your film is rewound, pull up on the rewind lever to open the camera back and release the roll of film so it can be removed from the camera back.
Medium Format
When shooting Medium Format film, you need a second, empty spool in your camera to pick up the roll of film as it is exposed. This is referred to as a take-up spool. Unlike 35mm film cartridges, into which you rewind your film after it has been shot, 120 film is not rewound onto the same spool. It remains on the take-up spool, and the original spool that held your unexposed film is then used as the take-up spool for your next roll. Medium Format cameras can differ greatly in functionality and how film is loaded. Be sure to read your camera manual and learn the ins and outs of loading for your particular camera before beginning. Some Medium Format cameras come with a removable magazine that will hold both the unexposed roll of film and the take-up spool. Other Medium Format cameras hold both spools directly within the camera. Either way, the basic idea of loading is the same.
- Before loading a new roll of film, make sure the empty take-up spool is in the take-up position. The location of the take-up position is different for certain cameras. Refer to your camera manual to locate.
- Load the unexposed roll of film into the space for the supply roll, fitting the end of the roll over the spool stud that holds the roll in place and secure with the spool clip on the other side of the roll. Take note of which way your roll of film should unroll before loading it, so that the film faces the right way when it moves through your camera back to be exposed.
- Remove the outer seal, keeping the roll intact. Pull the paper film leader carefully and insert the tab into the slot of the take-up spool. The path the film will take from the supply spool to the take-up spool will vary based on what camera you are using. As always, refer to your manual to make sure you're loading your particular camera correctly.
- Thread the film through the long slot of the take-up spool and pull through just enough so that film will catch when you wind it up.
- Wind the film (either by manually moving the metal wheel on the side of the take-up spool or by winding the film advance lever, depending on the type of camera you are using) until the arrow on the backing paper of your film is visible and lines up with the indicator mark on your camera (generally, this indicator is a line directly next to where your supply spool is loaded, but it can vary, so refer to your camera manual if needed).
- If loading a camera with a removable cartridge, place the cartridge back into the camera body (making sure the right side is facing up).
- Close the camera back and advance the film until the film counter reads 1. How you advance the film will vary from camera to camera. If your camera is automatic, it will advance to "1" if you press the shutter. Others will need to be manually advanced.
- After shooting the entire roll of 120 film, you need to wind the remaining film off of the supply spool and onto the take-up spool before opening the camera back. Some more advanced Medium Format cameras will do this automatically after your last exposure. If your camera requires you to manually advance your film, advance it after your final exposure until you feel the tension release.
- Open the camera back and remove the exposed roll of film. When shooting FUJIFILM 120 film, you will see an adhesive strip at the end of the exposed roll. Pull this tab open, fold over the end of the film strip and then and use the adhesive tab to secure the film in place.
Large format
All large format film must first be manually loaded into sheet film holders in complete darkness. This can be done in a darkroom, a changing bag, or in any room void of light (including all window light, light coming in from under door frames, etc.). Before you begin the film loading process, familiarize yourself with the holders, the film, and the order of items as you set them up before turning off all lights or placing items in the changing bag, so you can easily manage while in the dark.
- Orient the film holder so that the white or silver side of the darkslide is facing up. Many dark slides are black all over with just an indicator on them. Generally, dark slides have raised bumps on the lighter side of the slide, used as an indicator that the film inside the holder is unexposed. After exposing the film in the holder, put the darkslide back in place with the raised bumps facing inward, to indicate the film has been exposed.
- Open the film holder by pulling down the darkslide. You don't need to pull the darkslide down or out entirely; just pull it a few inches below the film guides (the overhanging lip on either side of the film holder, located under the darkslide).
- Open the film box and film pouch, remove one sheet of film, and hold it so that the emulsion side is facing up. While doing this in the dark, it can be ascertained that the emulsion surface is facing upward when the code notch is located at the upper right-hand corner of a vertical sheet.
- Once the film sheet is properly oriented with the emulsion side facing up, slide the sheet into the film holder, making sure it slides under the film guides on either side. Push the film sheet down until it is completely in place within the film holder.
- Next, slide the darkslide back into place, closing the film holder up completely and locking the darkslide into place (most film holders have a small lock along the edge that holds the darkslide in place when closed).
- Remember to keep the film boxes after loading your film. You can use them to store your exposed film before developing (make sure to mark them as exposed to avoid confusion).
- Loading the film holder into your Large Format camera may vary slightly depending on what camera you are shooting with. Refer to the camera's manual before proceeding. Generally, you will pull the frame release out on the back of the camera, insert the film holder into the space just behind the ground glass, and then let go of the frame release handle so the camera back closes again.
When photographic film is exposed, a "latent image" (an invisible image) is formed on the film through the molecular chemical reaction of the film emulsion when exposed to light. If the film has not been exposed to light, the developer process will not yield a visible image. The chemical reaction within the development process only occurs if the silver halides within the film emulsion have been exposed to light. In order to make this latent image visible, the film is processed by being submerged in a series of chemical baths. When processed, the exposed photographic film darkens or lightens to form a visible image. Once the film has been processed, the film exposure is permanent, and is now insensitive to light.
There are three main types of film processing used today: C-41, E-6, and Black & White.
C-41
The C-41 development process is intended for color negative films. During the "development" step of C-41 film processing, an oxidized developer reacts to the color layers of the film emulsion to result in the formation of dyes while the silver halides are concurrently being transformed to silver metal. When executed by a commercial C-41 processor, there is an additional step in the C-41 process after the initial development, through which a bleach solution is used to convert the developed silver image into silver halides, so that it is soluble in the fixer solution. There are simplified versions of the process that use a combined bleach-fix step. However, this is not used by professional labs, and is marketed for home use only.
E-6
E-6 processing is used for the development of transparency films. During the E-6 development process, a reversal bath is included, which turns the negative silver halides within each layer into a positive image.
Black & White (B&W)
Black & White processing is different than the development of color film, because B&W films typically have only one layer of emulsion and are sensitive only to the value of light, not the color. B&W film processing and development can be done at home without much difficulty, whereas color processing is best left to professional labs.
FUJIFILM-Certified Professional Labs
When processing film, it is critically important that temperature, agitation, timing, and chemical concentration are all skillfully controlled. This will ensure you generate consistent, accurate results in your final product. When temperatures are not correct, color film processing can risk drastic color shifts and can even under or over develop your film.
Looking to find a professional lab to work with for your film processing and scanning needs? Check out our list of FUJIFILM-Certified Professional Labs. These labs have undergone rigorous testing to ensure quality and consistency with their film processing systems. FUJIFILM continues to work with these labs on an ongoing basis to support their film processing needs.
Handling Film
Camera loading or removal of roll films should be done quickly and away from direct sunlight. Sheet films should be handled in total darkness, with care taken not to touch emulsion surfaces.
Storing Film
High temperatures and moisture can both cause adverse changes to your film. To safeguard against this, store unexposed film in a cool, dry and well ventilated location. Avoid storing film in hot, humid locations, such as the glove compartment or rear window of a car. High heat may cause changes to film speed and color balance. Modern films tolerate a lot, but by keeping them cool and processing your pictures promptly, you protect against potential damage to your photos.
For long term storage, keep your film in the freezer, below 32 degrees Fahrenheit. Or, for everyday storage during times when the temperature is higher, you may store your film in the refrigerator. To avoid moisture damage, put your film in a sealed plastic bag prior to storing in a fridge or freezer. When taken out of cold storage, film should be allowed to reach room temperature before opening by letting it stand over 3 hours (for refrigerated film) or over 6 hours (for frozen film). Opening the package/box while film is still colder than the surrounding environment may cause harmful condensation.
Once film has been exposed, its chemical makeup changes even more rapidly due to the physical effects of light on the silver halide crystals in the film emulsion. To ensure exposed film does not suffer loss of contrast and color quality, get your exposed film processed as soon as possible. Or, if you cannot have your film processed right away, refrigerate or freeze your exposed film in an airtight plastic container (to protect against moisture damage).
Expiration Dates
Over time, the chemical makeup of film begins to change. Some of these changes are due to external environmental causes such as radiation, heat, or moisture. Other changes are caused simply by the passing of time. For example, the sensitivity of the silver halides within a film's emulsion begins to degrade with time, and color masks and dyes within color film also start to break down. Photographic films come with set expiration dates to ensure that film can be used within the stated window of time that the film is guaranteed to have the correct chemical balance and appropriate reaction when exposed to light during the photographic process.
The main side-effects of time seen in expired film are loss of sensitivity and contrast and shifts in color balance. The extent to which these side-effects are visible varies based on the film type, the amount of time that has passed since the expiration date of the film, and most importantly, how the film has been stored. To ensure the best, most consistent outcome of your film photos, it's generally recommended that you use and develop film before its expiration date. Once the expiration date is passed there is a chance that there can be adverse changes to the color balance. However, if you have multiple rolls, you can test a roll of the film to see your likely results. If you receive satisfactory results with the test roll according to your own personal photographic standards, you may choose to use the remainder of your film stock.
Storing Film Negatives & Transparencies
The materials used in photographic film products will change over time. Since prints and film are usually used for the long-term recording of memorable events, as much effort as possible is made to use materials that exhibit the least amount of change over time, but the effects of light, heat, air, humidity and mold cannot be completely avoided. You can, however, minimize changes in processed film negatives & transparencies by storing them appropriately. Temperature and humidity control as well as dark storage are most important in minimizing the changes that occur in film. When storing film negatives, insert them into plastic (made of polyester, polystyrene, polyethylene or polypropylene) sleeves before placing them in non-airtight containers made of paper, plastic, or metal designed for the storage of photographs.
Processed film should be stored at a place as far away as possible from high temperatures, direct sunlight and other strong light and direct illumination. The following conditions should be avoided in the case of long-term storage:
- Storage in a closet lying against a wall that is exposed to cold, outside air (where condensation may form).
- Storage in an attic or on top of a closet or cabinet near the ceiling (where high temperatures may form).
X-Ray Safety - Updated 2/10/20
New and enhanced scanning technology at various airports in the United States is proving to be more damaging to unprocessed film than previous generations of scanners. Photographers and the International Imaging Industry Association (I3A) increasingly report undesirable effects of new airport scanners on images produced by both color and monochrome film that has undergone such scanning, including “fogging,” distortion in shadow areas, and generally poor image reproduction. This can happen after just one pass through the new scanners.
To protect your valuable film and photographs, Fujifilm encourages you to:
- Never pack unprocessed film in your checked baggage – this includes both exposed AND unexposed film, movie film, INSTAX instant film and film included in One-Time Usecameras.
- Always carry your film in your carry-on baggage and always ask for hand inspection when going through airport security. We recommend that all film be placed into a clear plastic bag for TSA inspectors, who are trained to check all types of film, including instant film and the film included One-Time Use cameras.
- When carrying large amounts of unprocessed film, contact the airline prior to your flight to arrange for a special baggage inspection.
- When practical, send film to your destination ahead of your flight, using a parcel or cargo carrier that will certify that the film will not be x-rayed. Please note that already processed film / photographic images are not generally affected by Xray/CT scanners. Please visit TSA Customer Service for answers to questions about screening policies, procedures, or what to expect at your airport security checkpoint.
Please note that already processed film / photographic images are not generally affected by Xray/CT scanners.
Please visit TSA Customer Service for answers to questions about screening policies, procedures, or what to expect at your airport security checkpoint.
You can download a copy of this article here.
Important Information Regarding Discontinuation of PRO 400H Film
FUJIFILM PRO 400H film is a unique product that is coated with a fourth layer – requiring specialized raw materials and chemicals. As it has become increasingly difficult to procure the raw materials needed to produce PRO 400H, we regret to inform you that after careful consideration, Fujifilm has made the difficult business decision to discontinue PRO 400H.
The discontinuation applies only to the following products:
135 PRO 400H EC NP 36EX 1
120 PRO 400 H EP EC 12EX NP 5
Based on recent customer demand, we anticipate that we will be able to allocate PRO 400H 120 film through the end of 2021.The production and sale of PRO 400H 135 will cease immediately, January 14, 2021.
Please note that this announced discontinuation applies only to PRO 400H color film. Fujifilm will continue to produce and sell its consumer color negative, color reversal and black-and-white film stocks to photographers.
If you have any additional questions, please contact Fujifilm customer service at 1-800-659-3854.
We are grateful for your continued support of Fujifilm.
You can download a copy of this article here.
On March 8, 2021, the Environmental Protection Agency (EPA) finalized a rule regarding the chemical phenol, isopropylated phosphate (3:1) (PIP (3:1)) (CASRN 68937-41-7) under the Toxic Substances Control Act (TSCA), which prohibited the processing and distribution in commerce, including sales, of the chemical and products containing the chemical. EPA also issued an enforcement policy on the same day stating that it will not enforce the ban on processing and distribution until September 5, 2021.
A miniscule amount (less than 0.0003%) of PIP (3:1) is present within the layers of FUJICHROME Velvia 100 Professional films. Fujifilm believes that the trace amount of PIP (3:1) in the FUJICHROME Velvia 100 Professional films pose no risk to the environment.
As a global leader in imaging, Fujifilm is committed to acting sustainably, and complying with all country regulations. As such, Fujifilm will discontinue FUJICHROME Velvia 100 Professional film in the U.S. effective immediately (July 6, 2021).
If you’ve purchased FUJICHROME Velvia 100 Professional films please read the accompanying Safety Data Sheet carefully.
Push and pull processing are done during development by manipulating the chemical process of developing film. It is executed by changing either the temperature of the developer, or the amount of time film is in the developer.
It's recommended that film be shot at box speed or your preferred exposure index that will allow for normal processing. However, there may be times when you need to rate film at a higher or lower speed to suit certain photographic conditions, requiring you to push-process or pull-process your film in development to compensate for doing so. To effectively increase or decrease the speed of a film, manually set the ISO rating to the new exposure index desired and then expose the entire roll of the film at that same exposure index (it generally cannot be done on a frame-by-frame basis, it must be the entire roll). When you remove the exposed roll of film, remember to mark it clearly for push- or pull-processing. This is generally done with a + or – symbol written on the roll of film followed by the number of stops it should be pushed or pulled, respectively. For example, +2 would mean push 2 stops.
Push-processing can be used when a roll of film is underexposed, either intentionally or accidentally. For example, if you are shooting with a 400 speed film but need 800 ISO to photograph with the light available, you could rate the film at 800 and then have that roll of film push-processed. Images created through push-processed film tend to have higher contrast and visibility of grain.
However, it is important to keep in mind that push-processing cannot "save" photos that have been drastically underexposed. If film is not exposed to enough light to cause a proper chemical reaction within the film emulsion, no amount of time in developer will be able to bring out an image where there is none. The film negative will remain blank. You need a certain amount of light to get the chemical reaction to begin within the film emulsion. If there is not enough light exposed to the film, there isn't anything in the film emulsion with which the developer can react, even if push-processing is implemented.
Reversely, film can be pull-processed if film is shot at a much lower ISO than box speed, causing it to be exposed too much. Pull-processing is generally not recommended for color negative film. Most color negative film has enough exposure latitude to handled overexposure and yield results that are subjectively acceptable, and pull-processing tends to cause flat contrast and muddy shadows. Pull-processing is most often done for high-speed black & white films rated at a lower ISO than box speed.
Notes:
- When pushing or pulling film, the entire roll is affected, because the process is done in the developing stage, which generally cannot be managed on a frame-to-frame basis.
- Push- and pull-processing can only be once during the development process. Once the film has been developed, the development process generally cannot be further adjusted.
Aperture, Shutter Speed, and ISO work together to determine the exposure (overall lightness or darkness) and overall esthetic of a photograph. The "Exposure Triangle" is a way of demonstrating how these three variables work together in direct correlation to achieve your desired results when creating an image.
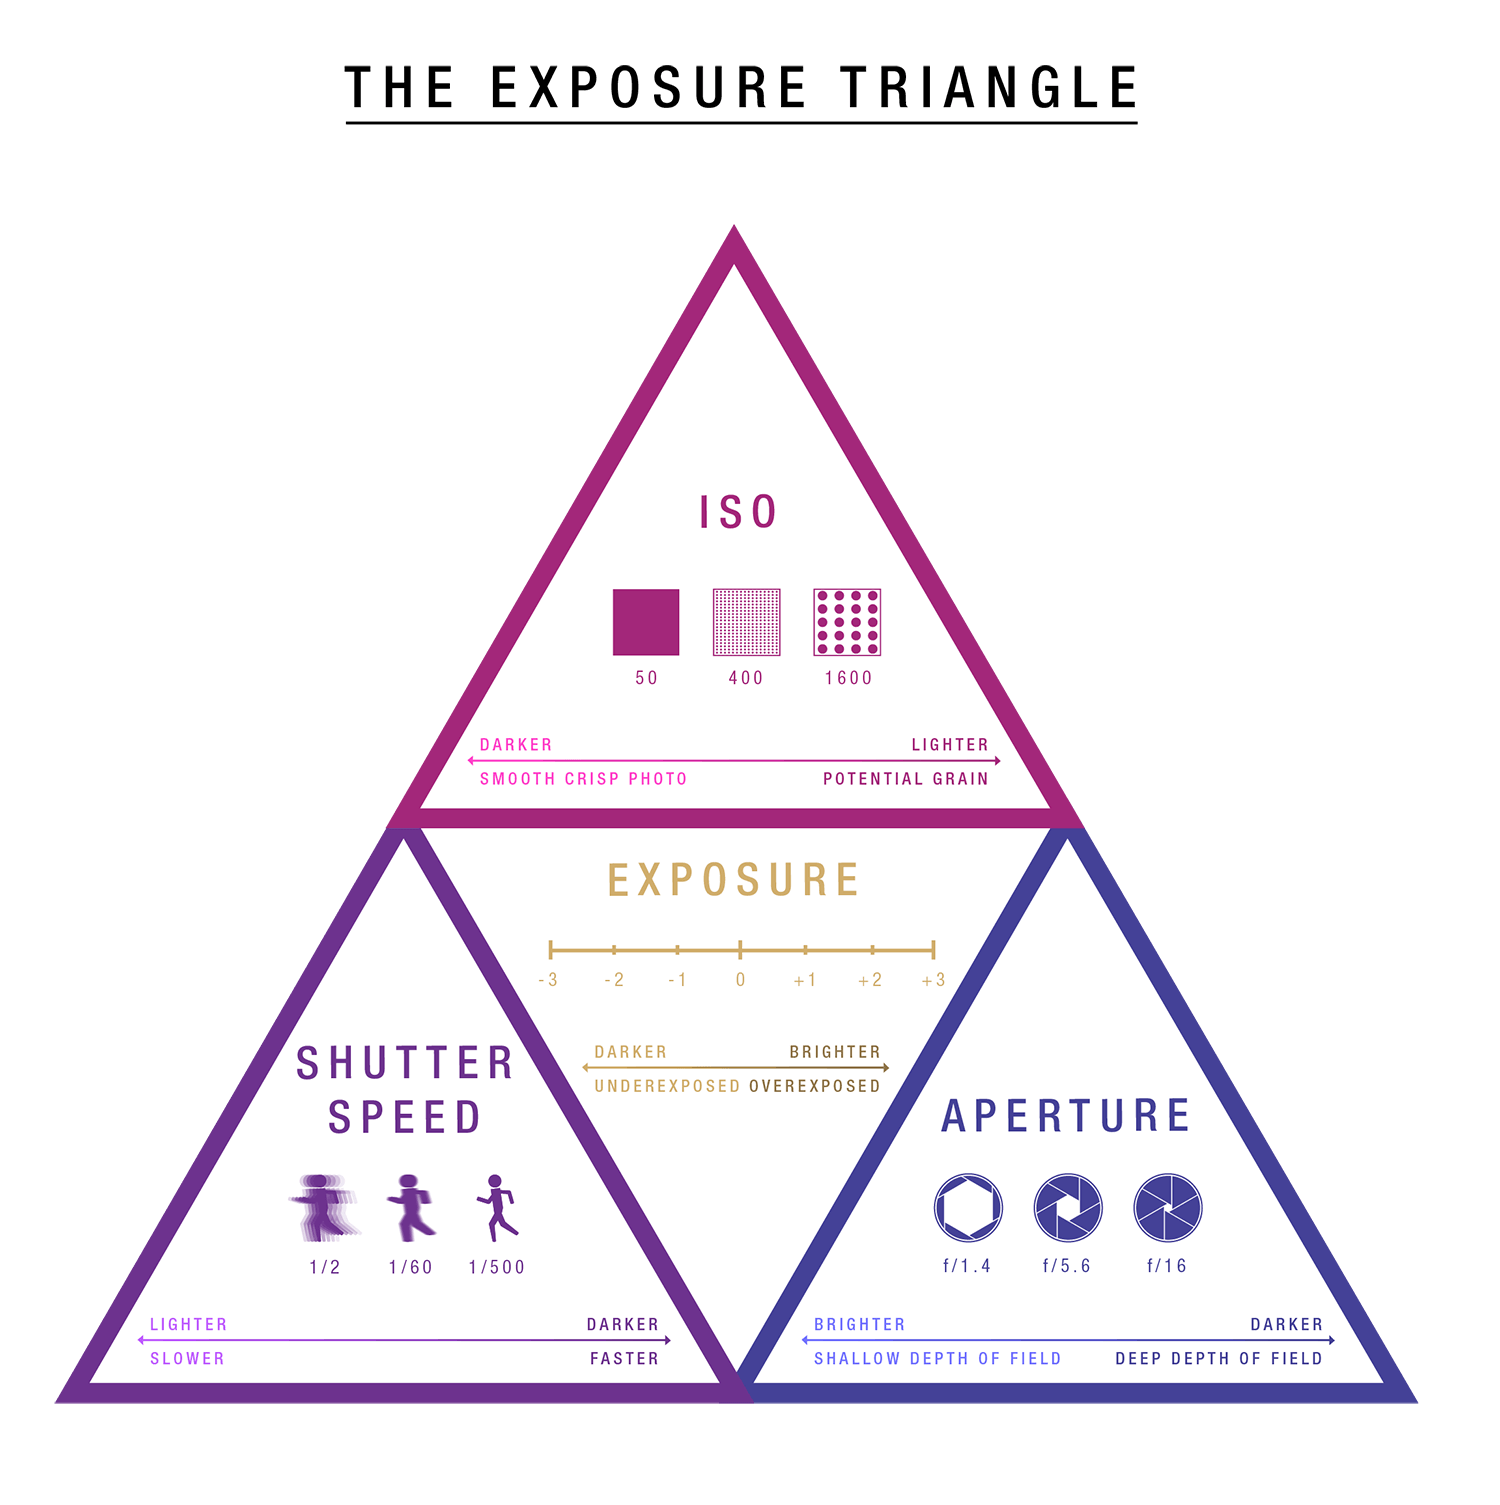
Aperture: How much light passes through the lens
Shutter Speed: How long the light hits the film
ISO: How sensitive the film is to light (aka Film Speed)
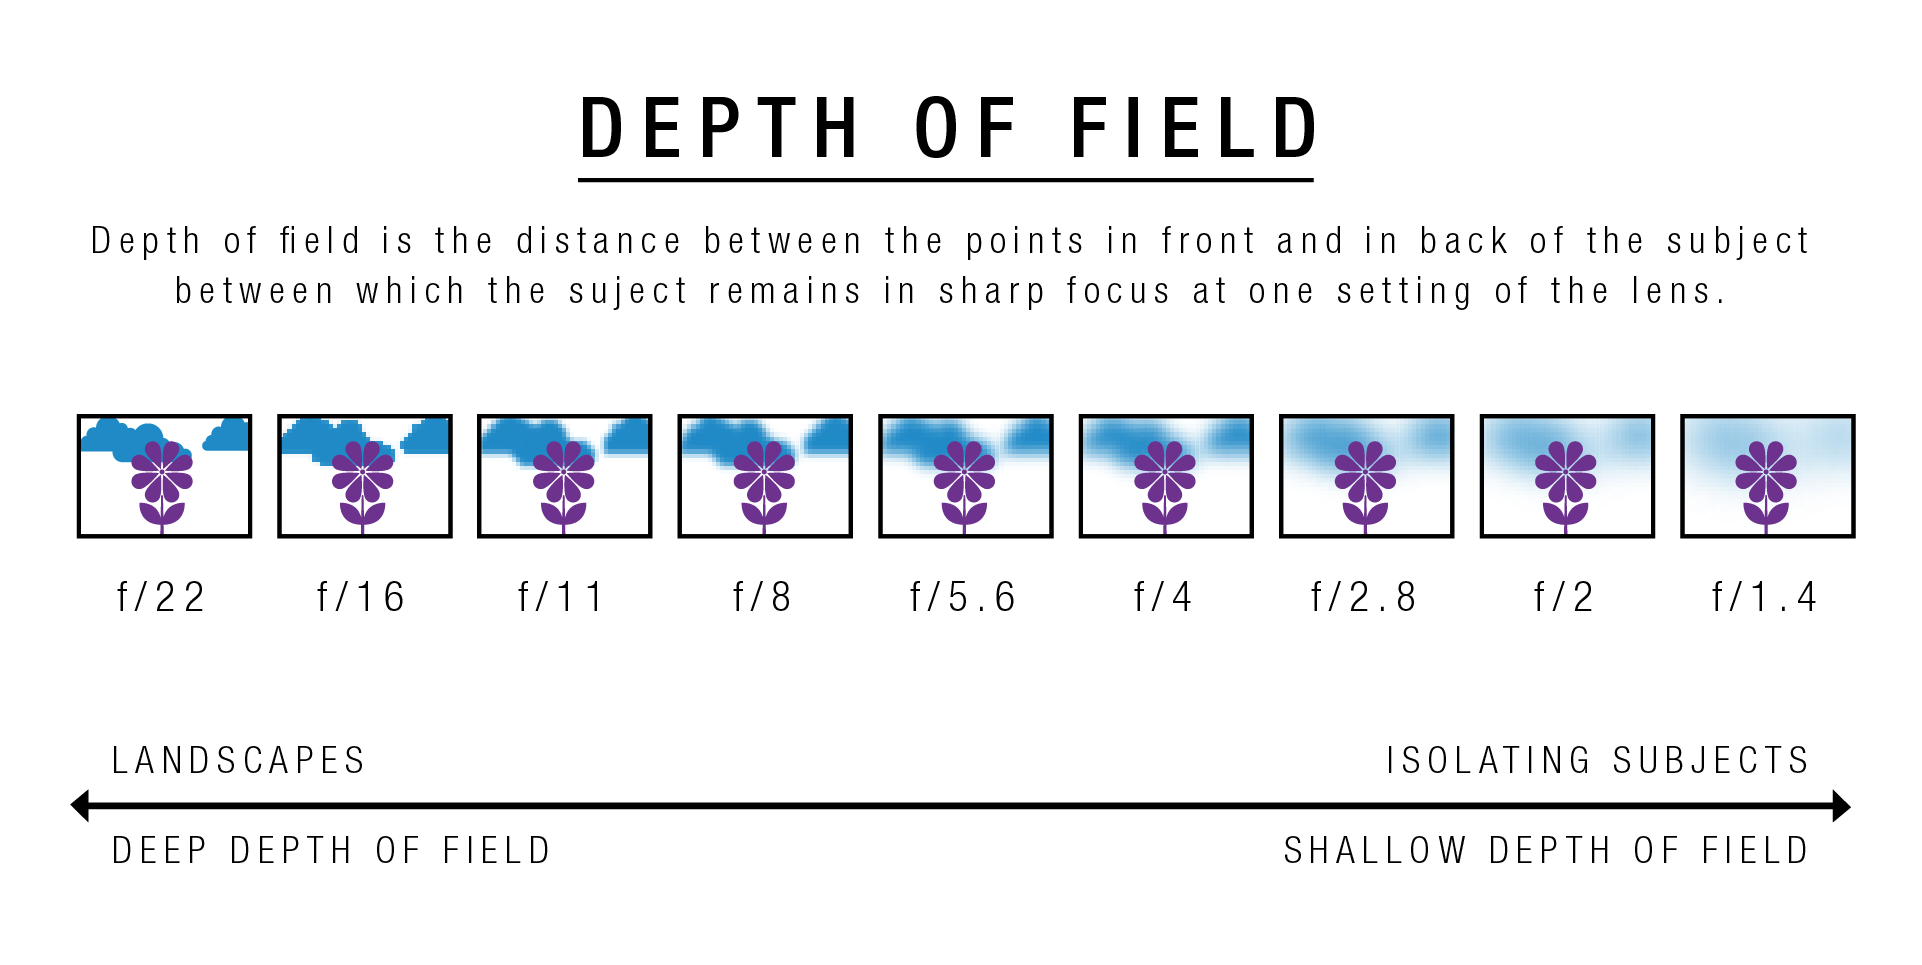
Aperture
Aperture is the diameter of the opening in your lens that light passes through to the film in your camera. It is measured as a fraction that relates to the opening of the lens, and is referred to as an f-stop, where f-stop = focal length of the lens/diameter of the lens. The wider your aperture, the lower the f/number. A lower f-stop means more light will be let in through the lens, because the opening is wider. A narrower opening will allow for less light to pass through, and is communicated as a higher f-stop.
Universal f-stops:
f/1f/1.4f/2f/2.8f/4f/5.6f/8f/11f/16f/22f/32
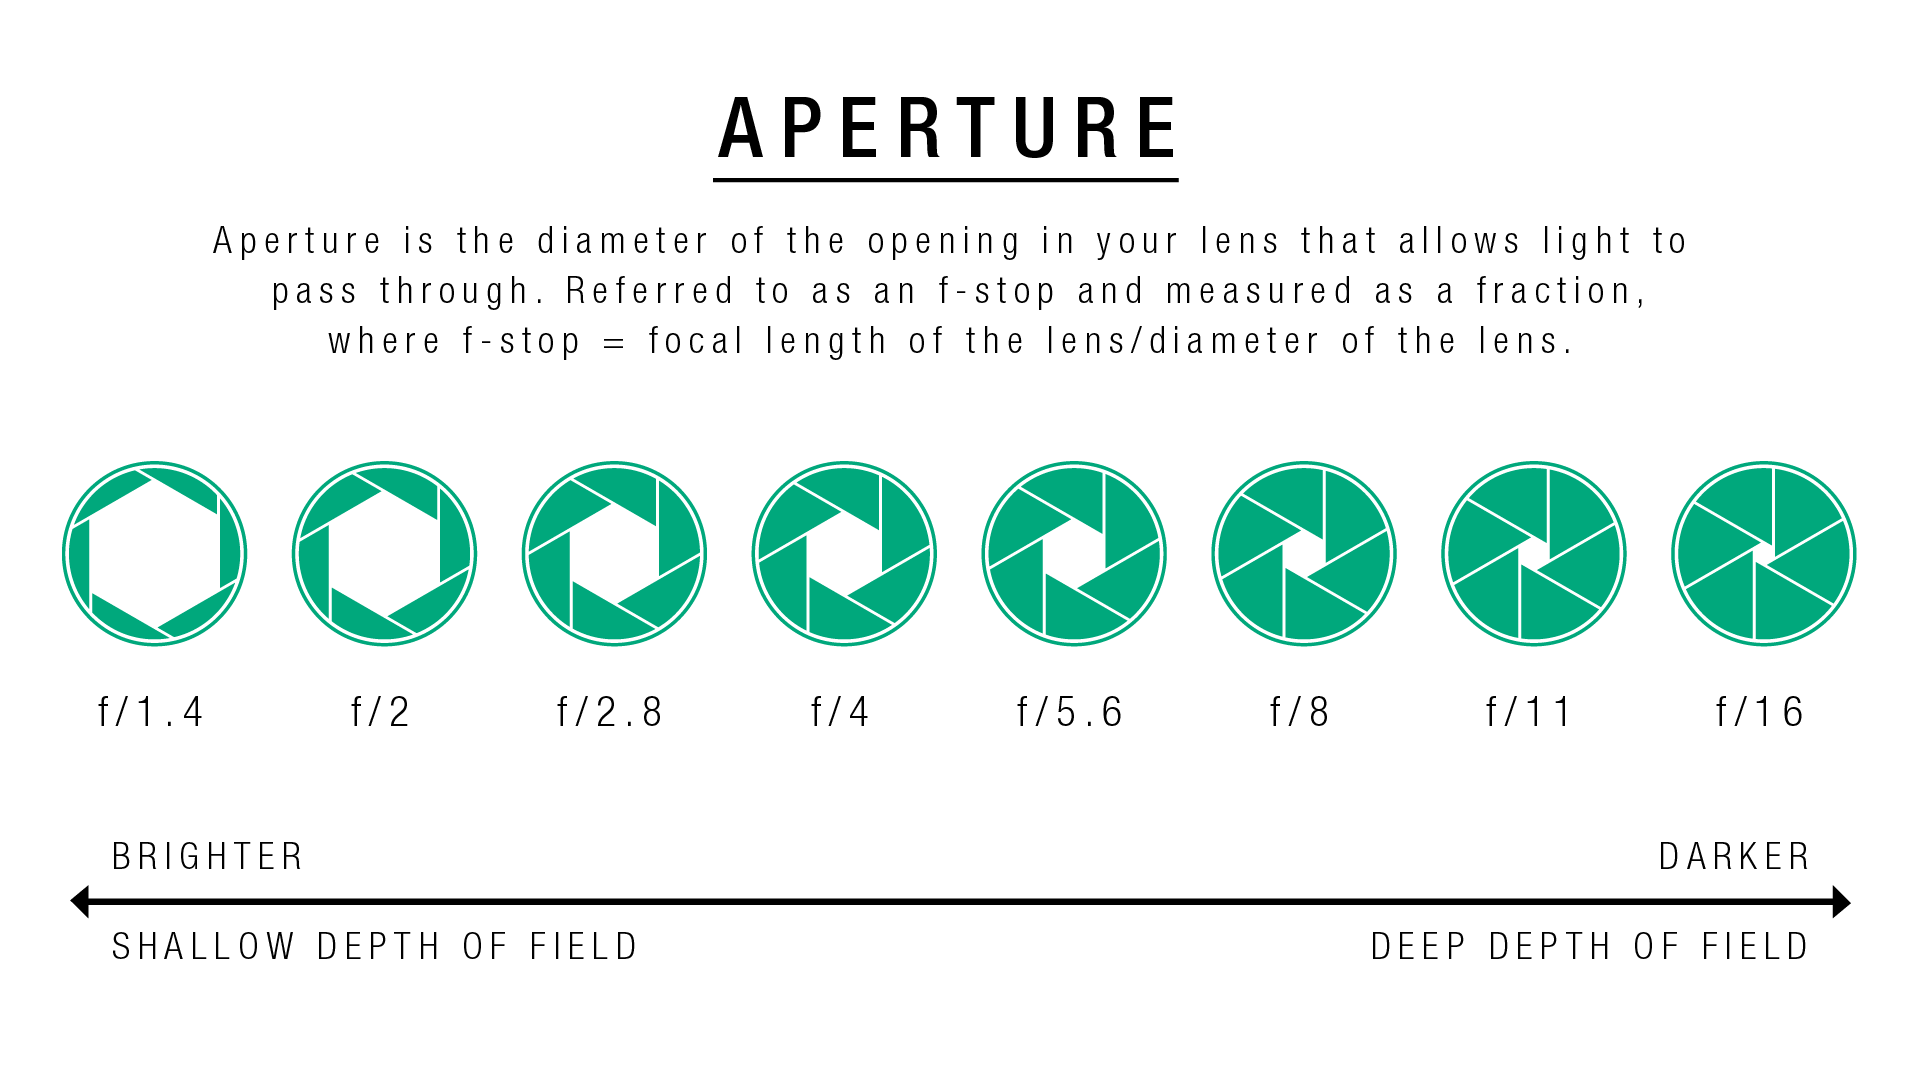
Aperture also affects depth of field. The smaller the aperture (larger the f-stop), the greater your depth of field (how deep within a scene will be in focus in your image).
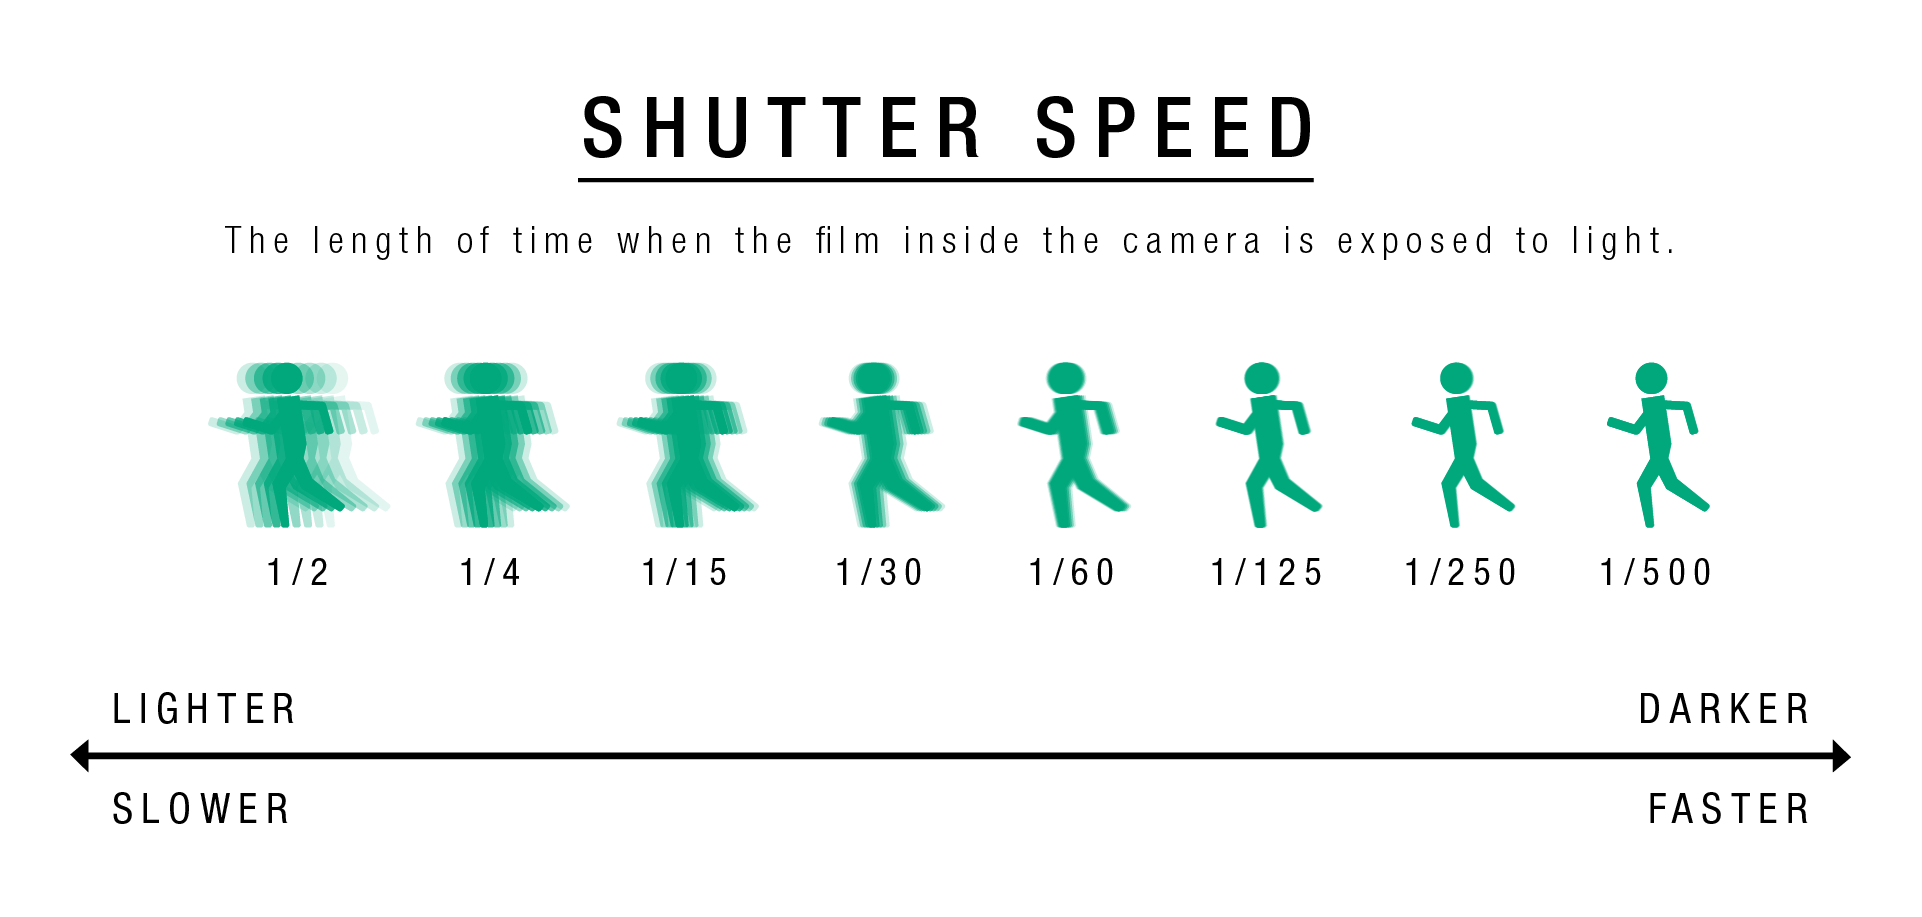
Shutter speed
Shutter speed is the length of time your shutter is open when you press the shutter release button on your camera. The longer your shutter is open, the more your film is exposed to light. Shutter speed is measured by fractions of a second. For example, if your shutter speed is 1/30, the shutter will be open (and your film exposed to light) for one thirtieth of a second. Generally, shutter speeds increase in a (sometimes rounded) 1:2 ratio, moving from 1/4 to 1/8, 1/15, 1/30, 1/60, 125, 1/250, and so on. Shutter speed also affects how movement is captured in your final image. Since your image is created during the entirety of the time your shutter is open, any movement that takes place in your scene during that time will be captured in your film (resulting in blur). If you want to avoid blur and are photographing an action shot, for example, someone running, you'd want a higher shutter speed, to avoid blur (capturing the image in less time, allowing for less visibility of movement during the exposure time).
ISO (Film Speed)
ISO is the measurement of a film's speed, defined by its sensitivity to light. The lower the film speed, the less sensitive to light and the finer the grain in the resulting image. The higher the film speed, the more sensitive to light and the larger the visible grain in the final image. Generally speaking, when shooting film, ISO will be the first variable you decide on before managing the rest of the Exposure Triangle to create the desired outcome in your final image.
Scanning Process
Creating digital files from processed film is done using a scanner, like the FUJIFILM FRONTIER SP-3000. A film scanner is in essence, a digital sensor that reads the film and then creates a digital file. When scanning negatives, the scanner inverts the data read to create the digital positive. For slide film transparencies, a scanner does not invert the data before creating the digital file.
Some scanners, including the FRONTIER SP-3000, can eliminate artifacts (small white specks that appear on digital files created by dust or scratches on the negative itself). The SP-3000 does this when scanning color negatives and transparency slide film through a second capture using an infrared light that passes through the emulsion. The film is then interpreted in a special way by software.
When scanning, in certain instances such as with the FRONTIER SP-3000, only certain image characteristics can be controlled and adjusted in the scanning process, while others are more strongly defined during the shooting and development process itself. A lab can generally adjust density (brightness), white balance and contrast during the scanning process. When using a FRONTIER SP-3000, the lab can also adjust saturation, but only for a complete roll. The lab cannot control major contrast, dynamic range, and selective color correction to mitigate reflective light, such as the green of grass bouncing onto a subject's face. Issues such as a heavy contrast and unflattering color reflections must be addressed at the time of the shoot, by adjusting your location and lighting environment.
Any one single color film negative can be scanned a myriad of ways, with many opportunities for interpretation by the scanner operator regarding the final outcome. This is why communication is key when working with a professional lab. For example, if you photograph your subject dramatically backlit by a window, and envision the end result being a dark and moody image where the shadows are dark and rich, you need to then communicate this objective to your lab. There is a lot of information stored in a film negative, and the scanner could conceivably scan that frame brighter than desired, making the shadows lighter than you envisioned when capturing the image.